


September 30, 2011
French Connection Cluster Frame Freebie

Wendy Gerber Art: Please Help!
This was posted on Wendy Gerber Art's blog yesterday. I thought I would pass it along.

Hello everyone! I normally don't do this online but right now I don't have much of a choice. I know we all are falling upon rough times and I hope you will understand my reasoning for doing this. We just found out last night that we need a substantial amount of money within the month to save our house. If we lose it we have nowhere to go, and I mean nowhere. So I am offering up all my scrap kits, cu items, and clearance items for $20. It would mean so much to me if you all could help me. If you can't I completely understand. I will also be coming up with a special offer for my tubes so stay tuned. Please repost this in any groups that you can. I will be making a few more announcements in the coming days. Nothing bad though. It will benefit you all!
There are also 4 tube specials going.
Special #1: Buy any 10 tubes for $8
Special #2: Buy any 20 tubes for $15
Special #3: Buy any 30 tubes for $20
Special #4: Buy all 54 of my tubes for $30
All of these specials will be lasting til the end of October, maybe even longer.
Please repost as much as possible and let all your friends know.
Find everything HERE, in the Buy My Store category.
Thank you for taking the time to read this.
♥

October's January Rain Blog Train: Jaggedy Lanterns
The train has left....
Here is my part:

You can download my part from my freebie blog HERE
Blog roll:
Amy: Capricious Scraps
Annette: Nette's NightOwl Works
Blue: Blue's Sweet Shop
Brenda: Ditz Bitz
Crys: Creative Scraps by Crys
Kara: Sweet Cravings Scraps
Kimberly: Scrap Rebellion
Lisa: fairytigerlilly
Rissa: Rissa's Designs (You're HERE)
Wy: designsbylk
September 29, 2011
Template #5: Pretty Girl Swag

September 25, 2011
FTU Haunted Halloween Kit

PTU Raydeo Active Tutorial

This tutorial is 100% my creation, any resemblance to any other tutorial is coincidence and not intentional.
You MUST have basic knowledge of PSP.
Font: Grog-Binge
I used a Kit called Raydeo Active by Junkin Punkin at Enchanted Dreams Boutique. You can purchase it here
Ready??
Ok let's get started then!!!
Ok let's get started then!!!
Open new canvas 600x600
Open Frame 6
Copy>Paste>Paste as new layer
Resize: 60
Duplicate and position similar to example
Duplicate your copy layer and move below your orginal frame layer
Choose your eraser tool
Choose your top frame layer and erase the black area of the fram that is over lapping the bow of your orginal frame layer
Open Element PP12 (paper)
Copy>Paste>Paste as new layer
Resize as needed
Place under your bottom frame layer
Choose your selection tool
Choose an area of your paper layer near the same size as your frame layer
Invert>delete
Select none
Duplicate your paper layer and place under your bottom fram layer
Open Medi_raydeo-active2 (poser)
Copy>Paste>Paste as new layer
Resize: 60
Move to the far right side of your right frame layer
(refer to example)
Open Medi_raydeo-active 3(poser)
Copy>Paste>Paste as new layer
Place under left frame layer and position as desired
Choose your selection tool
Select the border of your frame
Invert>Select Poser layer>delete
Select none
Set Opacity to around 89
Open buildings element
Copy>Paste>Paste as new layer
Resize: 50
Position above paper layer
Choose your select tool
select the area of your buildings layer that resides inside your frame layer
Select your buildings layer if you haven't already
Invert>Delete
Select none
Open Flower 9
Copy>Paste> Paste as new layer
Resize: 25
Place as top layer
Move to left corner of left frame layer
Open Flower 4
Copy>Paste>Paste as new layer
Resize: 20
Move to right side of other flower
Make this layer your top layer
Open Flower 8
Copy>Paste>Paste as new layer
Resize: 25
Move below Flower 4
Move over to the right side of Flower 4
Open pp2 (paper)
Layers>Load/save Mask>Load Mask from Disk
Choose your mask
Apply your mask
Right click your paper layer>Merge>Merge group
Copy>Paste>Paste as new layer
Make this your bottom layer
Resize as needed
Position as desired
Add your name text
Add your copyright (if required)
You should have something similar to my example
Thank you for checking out my tutorial!
September 19, 2011
PTU A Day At The Zoo Tutorial

This tutorial is 100% my creation, and resemblance to any other tutorial is coincidence and not intentional.
You must have basic knowledge of PSP.
Name Font: Complete in Him
Background Font: comic sans
Scrap kit: I used a scrap kit called A Day at the Zoo by Sleek N Sassy. You can purchase it here
You can find her blog here
You can find her blog here
Open a new canvas 600x600
Open Flowered Frame element
Copy>Paste>Paste as new layer
Rotate 90 degrees right
Resize: 85
Open your tube of choice.
Copy>Paste>Paste as new layer
I did not use a tube in this example!
Position as desired
Open Paper 9
Copy>Paste>Paste as new layer
Place under your frame layer
Choose your selection tool
Make a selection square/rectangle the size of your frame layer
Invert>select paper layer>delete
Select none
Set Opacity to 93
Open Monkey element
Copy>Paste>Paste as new layer
Position layer under frame layer
Resize: 55
Position green bar uner top frame edge
Choose your eraser tool and erase the green bar(leave all the tail)
Duplicate and move copy to above the frame layer
Delete the first part of the tail
This will make it so the monkey's tail is wrapped around the frame
Select bottom monkey layer
Effects>3D effects>drop shadow
Use these settings:
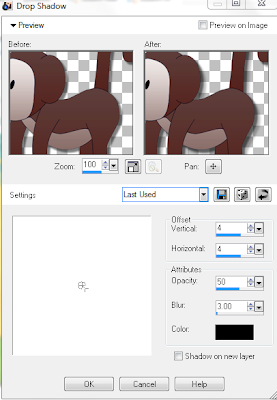
Offset:
Vertical: 4
Horizontal: 4
Vertical: 4
Horizontal: 4
Attributes:
Opacity: 50
Blur: 3
Color: Black
Blur: 3
Color: Black
Open Alligator element
Copy>Paste>Paste as new layer
Resize: 40
Move to bottom left corner of your frame
Effects>3D effects>dropshadow
Use previous settings
Open Flower Element
Copy>Paste>Paste as new layer
Position above your frame layer
Resize: 40
Move to the left bottom corner of your frame layer
Open Sign 2
copy>paste>paste as new layer
Resize: 40
Move to right side of frame layer (refer to example)
Duplicate
Move layer under frame layer
Choose your eraser tool and erase the pole part that is over lapping your frame layer near the bottom.
Open Train element
Copy>Paste>Paste as new layer
Resize: 20
Position at the top edge of the bottom of your frame layer
Choose your text tool
Text: Comic sans
Size: 5
Color: #8a5408
Add text: Monkeying Around (X3)
Copy>Paste in text box 13 times, this gives you a total of 14 rows
Position text layer over paper layer
Choose text tool
Add your name text
Add copyright (if needed)
you should have something similar to my example
Thank you for using/reading my tutorial! :)
Lobotomy Cluster Frame Freebie

September 18, 2011
PTU A Little Bit Rock N Roll Tutorial

This tutorial is 100% my creation, any resemblance to any other is coincidence and not intentional.
You must have basic knowledge of PSP.
Font I used is called: Orchid Black SSi
Scrapkit: I used the creative work of Jens Sweet Temptations. You can purchase it here
You can also find her blog here
Ready??
Ok...Ok...Let's get started!!
Ok...Ok...Let's get started!!
Open Paper 3
Copy>Paste>Paste as new layer
Resize to be smaller than your canvas
Choose your select tool
Select a rectangle
Invert>delete
Select none
Choose your preset shapes tool>rectangle
Make a small rectangle about half the size of your paper rectangle
Duplicate and move to the side of the other
You should now have two rectangles over your paper rectangle
Select your left small rectangle
Effects>3D effects>Chisel
Use these settings:
Size: 6
Color # ff40ff
Repeat for right small rectangle
Open Medi Punkie2 (poser)
Copy>Paste>Paste as new layer
Resize:75
Postion in bottom center of your canvas
Open Medi Punkie8 (poser)
Copy>Paste>Paste as layer
(do not resize)
Position above right rectangle layer (refer to example)
Select your right rectangle layer
Choose your wand tool
select your rectangle layer on your canvas
Invert
select your poser layer>delete
Select none
Set Opacity to around 45
Duplicate
Mirror your duplicate layer(it should position it directly across from original in the left rectangle)
Open Guitar 3
Copy>Paste>Paste as new layer
Resize: 45
Move to far right side near the edge of large rectangle paper layer
Duplicate and mirror
Open Flower 2
Copy>Paste>Paste as new layer
(do not resize)
Position directly behind Medi Punkie2 layer
Open Notes1 element
Copy>Paste>Paste as new layer
Resize as desired
Move to lay over the top petal of your flower
Duplicate and move layer to under your flower layer
Choose your eraser tool
Erase excess notes layer that is over far right flower petal
this will give you a weaving look
Open Notes2 element
Copy>Paste>Paste as new layer
Resize: 45
Move to far right top of your tag
Position layer above right small rectangle layer
Free hand rotate: 18
Open Crossbones1 element
Copy>Paste>Paste as new layer
Resize:75
Place under paper rectangle layer on the far left
Open Paper 11
Choose your mask
Layers>Load/save mask>Load mask from disk
select mask and apply
Right click paper layer>Merge>Merge group
Copy>Paste>Paste as new layer
Place as your bottom layer
Add your text
Add your copyright
You should have some similar to my example
Thank you for using/reading my tutorial!
PTU Lobotomy Tutorial


This tutorial is 100% my creation, any resemblance to any other tutorial is coincidence and not intentional.
You must have basic knowledge of PSP.
Tube of choice is Martin Abel. You must have a license to use his work. You can purchase his work here
Scrap kit I used is called Lobotomy by Wicked Princess Scraps. You can purchase it here
I used a FTU font called Pieces NFI. You can download it here
You ready???
Alrighty, Let's get started then!
Alrighty, Let's get started then!
Open a new canvas 600x250
Choose Gradient color
Open your Material Properties
Apply these colors
#000000
#808080
#800000
Now apply these settings:
Angle: 40
Repeats: 2
Check Invert
Flood Fill your canvas with your gradient.
Choose your texture
I used Bloody texture
Open>Copy>Paste>Paste as new layer
Layer Properties>Overlay
Select your gradient layer
Selections tab>select all
Selections tab>Modify>selct selction border
Use these settings:
Border width: 6
Inside
Anti-alias
Choose your color changer tool
Select desired color, i used a dark red and black mixture
Apply to your selected border area
Effects>3D effects>Outer Bevel
Use these settings:
Smoothness: 0
Depth: 20
Ambience: -6
Shininess: 20
Width: 8
Angle: 315
Intensity: 50
Elevation: 30
Color: white
Selections tab>select none
Open your tube of choice
I am using Martin Abel
Copy>Paste>Paste as new layer
Move to below your texture layer to the right side of your canvas.
Choose your tube layer
Choose your select tool
select the inside of your border
Invert>delete
Select none
this will delete any excess of your tube layer that was over your border area.
Open Element Barbwire
Copy>Paste>Paste as new layer
Resize: 70
Place below your tube layer and in the center of you canvas
Choose your select tool
Select the inner border edges
Invert>delete
Select none
Open Element Moon
copy>paste>paste as new layer
Resize: 25
Move to below tube layer and over to the far right of your canvas, top corner
Open Element Skulls
Copy>paste>paste as new layer
Resize: 40
Move to the far left lower corner
Refer to my example at the top of the tutorial
Open Element Knife
Copy>Paste>Paste as new layer
Mirror
Resize: 50
Place below skull layer and move to left side of canvas
Choose your text tool and text
Color: #930607
Both top and bottom text colors
Add text: Blood, Guts and Gore
Selections tab>From Vector Object
Selections tab>Modify>Expand
Expand to 2
Right click text layer>New Raster layer
Move Raster layer to below your text layer
Choose your Flood Fill tool and color #000000
Flood fill expanded area of text
Select none
Choose your text tool again
Use same text and text color #930607
Add text: Your name
Selections tab>From Vector Object
Selections tab>Modify>Expand>Expand to 2
Right click your text layer>New Raster Layer
Move Raster Layer below your text layer
Choose your Flood Fill tool and color #000000
Flood fill expanded area
Select none
Add your copyright
You should have something that looks similar to my example
Now for the Avatar!
Open new canvas 150x200
Flood fill with previous gradient color
Copy your texture>Paste>Paste as new layer
Layer Properties>overlay
Resize as needed
Copy your tube>Paste>Paste as new Layer
Place under your texture layer
Resize and position as needed
Selections tab>select all
Selections tab>Modify>Select selection border
Size: 4
Selections tab>Float
Choose your color changer tool
Repeat previous steps for border and outer bevel
select none
Copy Skulls element>Paste>Paste as new layer
Mirror
Resize: 18
Place in lower right corner
Add you Initial text
Add your copyright
You should have something that looks similar to the avatar in my example at the top.
September 17, 2011
PTU Vintage Memories Tutorial

This tutorial is 100% my creation, any resemblance to any other is coincidence and not intentional.
You must have working knowledge of PSP.
The tube I used is the FTU artwork of Ana Rasha. You can find her artwork here
Scrap kit I used is called Vintage Memories by Stargazer Musings. You can purchase it here
Font I use: Black Chancery
Ready???
Ok!
Let's start!!!
Ok!
Let's start!!!
Open a new canvas size 600x600
Open Frame Gold Frame 2
Copy>Paste>Paste as new layer
Resize: 85
Position in the center of your canvas
Open your tube of choice.
I am using the artwork of Ana Rasha(Girl In Pink)
Copy>Paste>Paste as new layer
Place tube layer under your frame layer
Duplicate tube layer and place copy above frame layer
Choose your eraser tool and erase any excess of the tube that is above the frame layer that you do not wish to keep above the frame layer.
Open Paper 6
Copy>Paste>Paste as new layer
Position under bottom tube layer
Choose your selection tool
select a square a bit smaller than your frame
Invert>delete
Select none
Open Paper 19
Layers>Load/Save Mask>Load Mask from disk
Choose your mask>Load
Right click paper layer>Merge>Merge group
Copy>Paste>Paste as new layer
Postion under paper layer
Resize as needed
Open Element Flowers On A Branch 2
Copy>Paste>Paste as new layer
Resize: 55
Move to left side of your frame and position as desired
Open element Branches 2
Copy>Paste>Paste as new layer
Resize: 55
Place under Flowers On A Branch Layer and move to the left of your frame directly under that element.
Open Flowers 1
copy>Paste>Paste as new layer
Place directly above paper layer behind your bottom tube layer
(do not resize)
Open Flower 6
Copy>Paste>Paste as new layer
Move to be above top tube layer
Resize: 45
Move to be at the bottom left of your frame layer
Open Flowers 7
Copy>Paste>Paste as new layer
Resize: 45
Move to the right side of Flower 6
Choose your text tool
Choose your text of choice and type Vintage
Change top and bottom colors to #724c0a
Rotate to your left so you text is read horiztonal
Move to the left side of your frame
Selection tab>From Vector Object
Selections tab>Modify>Expand
Use these settings:
Number of Pixels: 2
Right click your vector layer>New Raster Layer
Place below your vector layer
Choose your Flood Fill tool
Color: #aa8361
Flood your expanded area with the color
Select none
Effects>3D effects>Drop Shadow
Use these settings:
Offset:
Vertical: 4
Horizontal: 4
Attributes:
Opacity: 50
Blur: 3
Color: Black
Choose layer Vector 1
Effects>3D effects>Inner Bevel
Use these settings:
Smoothness: 10
Depth: 6
Ambience: -11
Shininess: 51
Color: White
Angle: 10
Intensity: 26
Elevation: 32
Width: 4
Apply these setting twice to the same layer
Repeat previous steps for your "Memories" text
Choose your text tool once again and type your name
Color: #aa8361
Repeat previous settings using color #724c0a as your Flood Fill color.
Only use inner bevel settings once.
Place near the bottom right of your frame
Add your copyright.
You should have something similar to my example.
Thank you for using/reading my tutorial!
PTU Trick R Treat Tutorial

This tutorial is of my own creation, any resemblance to any other is coincidence and not intentional.
You must have working knowledge of PSP.
Scrapkit: I used the work of Alika Scraps a kit called Trick R Treat. You can purchase it here
Font: Halloween Spider. You can find it here
Tube of choice I used the artwork of Keith Garvey. You must have a license to do so. You can purchase his work here and request a license number.
Supplies needed from scrapkit:
Paper 10
Cauldron 2
Paper 07
Pumpkin 2
Bat 2
Bow 05
Web 04
Web 05
Spider 1
Ready???
Alright.
Let's get started!
Alright.
Let's get started!
Open a new canvas size 600x600
Choose your preset shapes Eclipse tool
Choose the circle shape
Make a circle to the size of your liking(or about the size in my example)
Open Paper10
Copy>Paste>Paste as new layer
Choose your wand tool>select circle layer>Invert
Select your paper layer>delete
Delete your circle layer.
Open Element Cauldron 2
Copy>Paste>Paste as new layer
Resize to 60
Move to lower left
Open your tube of choice.
Postion as desired.
Add dropshadow with these settings:
Offset:
Vertical: 4
Horizontal: 4
Attributes:
Opacity: 50
Blur: 3
color: black
Open Paper07
Layers>Load/save Mask
Choose your mask of choice and apply
Right click>Merge>Merge group
Copy>Paste to your tag window>Paste as new layer
Position under your paper layer
Resize as needed
Open Pumpkin2
Copy>Paste>Paste as new layer
Resize: 75
Position as desired or refer to my example
Open bat2
Copy>Paste>Paste as new layer
Resize: 60
Move to top left side, postion as desire and rotate using your Pick tool
Open Bow05
Copy>Paste>Paste as new layer
Resize: 50
Move to far left over edge of your paper layer
Open Web05
Copy>Paste>Paste as new layer
Scale to fit behind your paper layer and position as needed
Open Web4
Copy>Paste>Paste as new layer
Resize: 65
Position under bat layer and to your far right
Open Spider1
Copy>Paste>Paste as new layer
Resize: 35
Place to the right side over the paper layer edge
Add your text and copyright
You should have something that looks similar to my example
Thank you for taking time to use/read my tutorial
September 16, 2011
Death Becomes Her: Cluster Frame Freebie

September 15, 2011
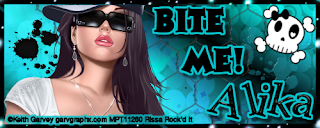
PTU Bite Me Forum Set Tutorial
This tutorial is of my own creation. Any resemblance to any other tutorial is coincidence and not intentional.
You must have basic working knowledge of PSP.
Select your tube of choice. I am using the artwork of Keith Garvey. You MUST have a license to use his work. You can purchase his art and a license here
Select your tube of choice. I am using the artwork of Keith Garvey. You MUST have a license to use his work. You can purchase his art and a license here
Scrapkit I used is the work of Alika's Scraps called Bite Me. You can purchase it here
Texture I used was the FTU Texture Pack #4 by Brutal Designs. You can get that here
Word Art Text: Tristan
Name Text: Tipsy Giggles
Copyright Text: Sanserif
Name Text: Tipsy Giggles
Copyright Text: Sanserif
Supplies needed:
Bite Me Kit
Elements from kit needed:
as22
as44
as35
as36
Brutal Designs FTU Texture Pack 4
2 types of Fonts
Tube of choice
License to use tube(if required)
Elements from kit needed:
as22
as44
as35
as36
Brutal Designs FTU Texture Pack 4
2 types of Fonts
Tube of choice
License to use tube(if required)
Open a new canvas size 500 x 200
Go to your materials>choose gradient then open your materials properties.
Color 1: #37ddda
Color 2: #000000
Apply these settings:

Angle: 36
Repeats: 2
Select Invert
Choose your Flood Fill tool and fill your canvas with your gradient color.
Open your texture (Brutal Designs texture Pack 4-Texture Pack 30 texture)
Copy>Paste>Paste as new layer
Layer properties>Overlay
Select your bottom layer
Now choose your selections tab>Select all
Selections>Modify>Select Selection Border
Use these settings:

Border Width: 6
Inside
Anit-Alias
Selections tab>Float
Choose your color changer tool
Change your gradient tab back to color and change the color to black #000000
Fill in the border selection with color.
Effects>Artistic Effects>Balls and Bubbles
Use these settings:
Automatic multiple ball or bubbles
Coverage: 100
Average size: 15
Size variation: 75
Balls or Bubbles type: non intersecting
Seed: 0
Select>defloat>select none
Open your tube of choice. In this case I'm using the work of Keith Garvey.
Select your close up layer>Copy>Paste>Paste as new layer
Resize to your liking.
See mine here:

Open Element as22
Position under your tube layer
Choose your select tool>Selection
Make a rectangle selection around the inner edge of your border while still on the element layer.
Selections tab>Invert>delete
Selections tab>select none
Open Element as36
Copy>Paste>Paste as new layer
Position under Elemnt as22
Resize to 40
Move to far right side of your canvas, place over canvas and before your border layer in the lower right.
Set Opacity to around 48
Open layer as35
Copy>Paste>Paste as new layer
Position above layer as22
Resize to 40
Move to far left side of your canvas and place near the top.
Open Element as44
Copy>Paste>Paste as new layer
Position above layer as35
Resize to 30
Image>Free Rotate
Settings:
Right>18%
Move to upper right corner
Choose your text tool
Choose your font. I used a font called Tristan
Make both top and bottom color black #000000
Click on the canvas and add the text BITE ME!
(size of text depending on font of choice, mine was about 25)
Position to your liking
Selections tab>From Vector Object
Selections tab>Modify>Expand>Size 3
Right click Vector layer>Create new raster layer
Move below Vector layer
Flood fill Raster layer with #06c7d0
select none.
Effects>3D effects>Drop Shadow
Settings:

Offset:
Vertical: 6
Horizontal: 6
Attributes:
Opacity: 50
Blur: 3
Color: Black
Choose your text tool
Choose a different font. I used Tipsy Giggles
Repeat steps above for your name text.
Now select your top layer of your name text
Effects>3D effects>Inner bevel
Use these settings:
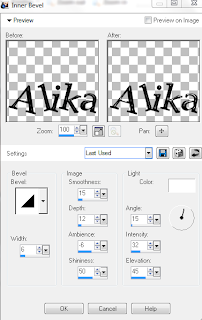
Image:
Smoothness: 15
Depth: 12
Ambience: -6
Shininess: 50
Light:
Color: White
Angle: 15
Intensity 32
Elevation: 45
Bevel:
color: Black
Width: 6
Add your copyright
You should have something similar to my example at the top of this tutorial.
Now for the avatar!
Open new canvas size 250x250
Flood fill with previous gradient settings
Apply your texture
Layer Properties>Overlay
Select Bottom layer
Selections tab>Select all
Selections tab>Modify>Select Selection Border
Selections tab>Float
Effects>Artistic Effect>Balls and Bubbles
Use previous settings
Selections tab>defloat
Select none
Select your close up tube layer>Copy>Paste>Paste as new layer
Resize to your liking.
Open Element as22
Repeat previous steps for this.
Open Element as36
Repeat previous steps for this.
Choose text tool, add your initial and repeat the steps for adding your name layer.
Repeat Inner Bevel steps.
Add your copyright and you should have something similar to this.

Thank you for taking your time to use/read my tutorial.
September 14, 2011
Tags
Here are a few tags I've done recently:


Tutorial: The Devil's Desire
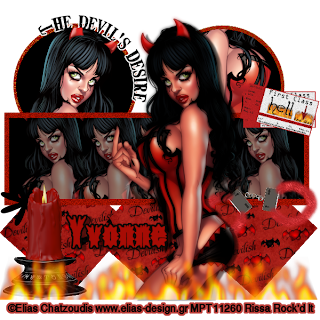
This tutorial is of my own creation any resemblance to any other tutorial is purely coincidence and was not intentional. This tutorial is for personal use only!!!
Text: Aftermath BRK (name only)
You can download my template here
Scrapkit is the work of Scraps by Randy's Sin, you can download the kit here
You will need knowledge of PSP to complete this tutorial.
Open your template and delete Raster 4 and Vector 3.
Now let's get started!
First thing we're going to do is select Layer 8.
Select your Color changer tool.
Then set your color to #c71903.
Fill Layer 8 with that color.
Repeat for Layers 1, 2, 4 and 6 with the same color.
Select Layer 3.
Set your color to #ab0c05
Fill layer 3 with that color.
Select layer 9.
Set your color to #000000.
Flood fill layer 9 with this color.
Repeat with layers 5 and 7.
Open your tube of choice.
Copy>paste>paste as new layer
Position full tube on tag as you wish.
Duplicate tube.
Adjust>Blur>Gauassian blur
Set Layer property to multiply.
Effects>3D effects>drop shadow
Use these settings:

Offset:
Vertical: 3
Horizontal: 8
Attributes:
Opacity: 50
Blur: 3
Color: black
Horizontal: 8
Attributes:
Opacity: 50
Blur: 3
Color: black
Paste another layer of your tube.
Position above Layer 9.
Resize tube to your liking and position to the right above layer 9.
Choose your wand tool and highlight layer 9.
Invert selection>select tube layer>delete
select none.
Set Opacity to around 55.
Copy that tube layer>paste>paste as new layer beside previous tube layer.
Position beside that tube layer.
Do this 3 or 4 more times to fill layer 9 with those tube layers.
Now copy a new tube layer>paste>paste as new layer
Position tube layer over layer 5.
Select layer 5.
Choose your wand tool and highlight layer 5.
Invert Selection.
Select tube layer>delete.
Select none.
Paste another new tube layer.
Position above Layer 7.
Select Layer 7.
Choose your wand tool and highlight layer 7>invert selection
select tube layer>delete.
select none.
Open Paper 11
Select Layer 1>choose wand tool and highlight
Copy Paper 11>Paste>Paste into selection
Select none.
Repeat for Layers 2 and 3
Elements I used:
Candle 3
Flames 1
Ticket to Hell 1 (for this one delete Layer 10, you may also choose to do this to Vector 1)
Cuffs 1
Resize these and place them as you desire.
Add your text.
Add your copyright.
You should have something similar to my example at the top.
Thank you for using/reading my tutorial. Please leave a comment and let me know what you think.
Subscribe to:
Comments
(Atom)
I CT For


CU4CU License


")

