


September 15, 2011
PTU Bite Me Forum Set Tutorial

This tutorial is of my own creation. Any resemblance to any other tutorial is coincidence and not intentional.
You must have basic working knowledge of PSP.
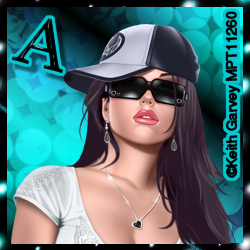
Select your tube of choice. I am using the artwork of Keith Garvey. You MUST have a license to use his work. You can purchase his art and a license here
Select your tube of choice. I am using the artwork of Keith Garvey. You MUST have a license to use his work. You can purchase his art and a license here
Scrapkit I used is the work of Alika's Scraps called Bite Me. You can purchase it here
Texture I used was the FTU Texture Pack #4 by Brutal Designs. You can get that here
Word Art Text: Tristan
Name Text: Tipsy Giggles
Copyright Text: Sanserif
Name Text: Tipsy Giggles
Copyright Text: Sanserif
Supplies needed:
Bite Me Kit
Elements from kit needed:
as22
as44
as35
as36
Brutal Designs FTU Texture Pack 4
2 types of Fonts
Tube of choice
License to use tube(if required)
Elements from kit needed:
as22
as44
as35
as36
Brutal Designs FTU Texture Pack 4
2 types of Fonts
Tube of choice
License to use tube(if required)
Open a new canvas size 500 x 200
Go to your materials>choose gradient then open your materials properties.
Color 1: #37ddda
Color 2: #000000
Apply these settings:

Angle: 36
Repeats: 2
Select Invert
Choose your Flood Fill tool and fill your canvas with your gradient color.
Open your texture (Brutal Designs texture Pack 4-Texture Pack 30 texture)
Copy>Paste>Paste as new layer
Layer properties>Overlay
Select your bottom layer
Now choose your selections tab>Select all
Selections>Modify>Select Selection Border
Use these settings:

Border Width: 6
Inside
Anit-Alias
Selections tab>Float
Choose your color changer tool
Change your gradient tab back to color and change the color to black #000000
Fill in the border selection with color.
Effects>Artistic Effects>Balls and Bubbles
Use these settings:
Automatic multiple ball or bubbles
Coverage: 100
Average size: 15
Size variation: 75
Balls or Bubbles type: non intersecting
Seed: 0
Select>defloat>select none
Open your tube of choice. In this case I'm using the work of Keith Garvey.
Select your close up layer>Copy>Paste>Paste as new layer
Resize to your liking.
See mine here:

Open Element as22
Position under your tube layer
Choose your select tool>Selection
Make a rectangle selection around the inner edge of your border while still on the element layer.
Selections tab>Invert>delete
Selections tab>select none
Open Element as36
Copy>Paste>Paste as new layer
Position under Elemnt as22
Resize to 40
Move to far right side of your canvas, place over canvas and before your border layer in the lower right.
Set Opacity to around 48
Open layer as35
Copy>Paste>Paste as new layer
Position above layer as22
Resize to 40
Move to far left side of your canvas and place near the top.
Open Element as44
Copy>Paste>Paste as new layer
Position above layer as35
Resize to 30
Image>Free Rotate
Settings:
Right>18%
Move to upper right corner
Choose your text tool
Choose your font. I used a font called Tristan
Make both top and bottom color black #000000
Click on the canvas and add the text BITE ME!
(size of text depending on font of choice, mine was about 25)
Position to your liking
Selections tab>From Vector Object
Selections tab>Modify>Expand>Size 3
Right click Vector layer>Create new raster layer
Move below Vector layer
Flood fill Raster layer with #06c7d0
select none.
Effects>3D effects>Drop Shadow
Settings:

Offset:
Vertical: 6
Horizontal: 6
Attributes:
Opacity: 50
Blur: 3
Color: Black
Choose your text tool
Choose a different font. I used Tipsy Giggles
Repeat steps above for your name text.
Now select your top layer of your name text
Effects>3D effects>Inner bevel
Use these settings:
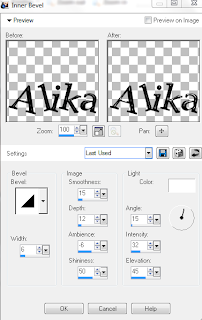
Image:
Smoothness: 15
Depth: 12
Ambience: -6
Shininess: 50
Light:
Color: White
Angle: 15
Intensity 32
Elevation: 45
Bevel:
color: Black
Width: 6
Add your copyright
You should have something similar to my example at the top of this tutorial.
Now for the avatar!
Open new canvas size 250x250
Flood fill with previous gradient settings
Apply your texture
Layer Properties>Overlay
Select Bottom layer
Selections tab>Select all
Selections tab>Modify>Select Selection Border
Selections tab>Float
Effects>Artistic Effect>Balls and Bubbles
Use previous settings
Selections tab>defloat
Select none
Select your close up tube layer>Copy>Paste>Paste as new layer
Resize to your liking.
Open Element as22
Repeat previous steps for this.
Open Element as36
Repeat previous steps for this.
Choose text tool, add your initial and repeat the steps for adding your name layer.
Repeat Inner Bevel steps.
Add your copyright and you should have something similar to this.
Thank you for taking your time to use/read my tutorial.
Subscribe to:
Post Comments
(Atom)
I CT For


CU4CU License


")


0 comments:
Post a Comment