


March 30, 2012
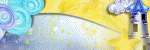
Lil Red Tag
Here's a tag that I made for my friend Kate using her kit Ruby & the Wolf. You can find her blog here

PTU Florality Tutorial

This tutorial is 100% my creation, any resemblance to any other is coincidence and not intentional.
Written: 3/30/12
Must have basic knowledge of PSP
I used the artwork of Lady Mishka (previously bought at SATC) You must have a license to use her work you can get that and now find her work here
Scrap Kit by Chi Chi Designz called Florality. You may purchase that here
Let's get started
Open a new canvas 600x600
Open FlowerFrame1
Copy>Paste>Paste as new layer
Resize as needed
Place a little off center in your canvas
Open Paper 12
Copy>Paste>Paste as new layer
Resize as needed
Delete excess around frame edges
Add your tube
Open Bird
Copy>Paste>paste as new layer
Resize as needed
Place in the bottom left area of your frame
Open Butterflies
Copy>paste>paste as new layer
Do not resize
Place under your tube layer
Add drop shadow
Open Flower1
Copy>Paste>paste as new layer
Downsize
Place near your Bird layer
Add your name text
Add your copyright and watermark
You should ahve something similar to my example
~Thank you for using my tutorial~
March 29, 2012
PTU Fairy Whispers Tutorial

This tutorial is 100% my creation, any resemblance to any other is coincidence and not intentional
Written: 3/29/12
You must have basic knowledge of PSP
I used the artwork of Joel Adams. You must have a license to use his work. You can get that and purchase his work here
Scrap Kit by Shani of Wicked Princess Scraps called Fairy Whispers. You can purchase that here
Let's get started!
Open new canvas 600x600
Open Glitterframe
Copy>Paste>Paste as new layer
Resize as needed
Place in the center of your canvas
Open Paper08
Copy>Paste>Paste as new layer
Resize as needed
Place under your frame layer
Delete excess paper around your frame edges
Add your tube
Add drop shadow to your liking
Open Paper03
Resize to 600x600
Choose your mask and open
Layers>New mask layer
Apply your mask
Merge>Merge group
Copy>Paste>Paste as new layer
Make this your bottom layer
Resize if needed
Open Branch
Copy>Paste>Paste as new layer
Resize to your liking
Place under your main paper layer
Move to your far right
Duplicate
Image>Mirror
Open Scatter
Copy>Paste>Paste as new layer
Resize as needed
Move near the top of your canvas
Duplicate
Image>Flip
Add your copyright and watermark
Add your name text
You should have something similar to my example
~Thank you for using my tutorial~
March 25, 2012
PTU Her Diary Tutorial

This tutorial is 100% my creation, any resemblance to any other is coincidence and not intentional.
Written: 3/25/12
You must have basic knowledge of PSP
I used the artwork of Steve Baier. You must have a license to use his work. You can get that and purchase his work here
Scrap Kit by Horseplay's Pasture Designs called Her Diary. You can purchase it here
Let's get started!
Open a new canvas 600x600
Open Element 66
Copy>Paste>Paste as new layer
Resize as needed
Place in the center of your frame
Open Paper 5
Copy>Paste>Paste as new layer
Resize as needed
Place under your frame layer
Delete excess around outer edges
Open Paper 4
Resize to 600x600
Open your chosen mask
Select your paper layer
Layers>New mask layer
Apply your mask
Merge>Merge group
Copy>Paste>Paste as new layer
Resize as needed
Make this your bottom layer
Add your tube
Add drop shadow
Open Element 2
Copy>Paste>Paste as new layer
Resize as needed
Place above your mask layer
Add your drop shadow
Open Element 41
Copy>Paste>Paste as new layer
Resize as needed
Place to your desire
Open Element 27
Copy>Paste>Paste as new layer
Resize as needed
Place near the bottom left corner of your frame layer
Add drop shadow
Open element 46
Copy>Paste>Paste as new layer
Downsize a bit
Place behind your tube layer in the center or your canvas
Add yoru drop shadow
Open Element 42
Copy>Paste>Paste as new layer
Resize as needed
Place near the bottom right of your frame layer
Add drop shadow
Add your name text
Add your copyright and watermark
You should have something similar to my example
~Thank you for using my tutorial~
March 23, 2012
Tags


I made this 3 piece set for my friend Kate over at 2 Irish Bitches Designs Blog
PTU S&M Tutorial

This tutorial is 100% my creation, any resemblance to any other is coincidence and not intentional.
Written: 3/23/12
You must have basic knowledge of PSP
I used the artwork of Verymany. You must have a license to use his work. You can get that and purchase his artwork here
Scrapkit by Tammy's Scraps called S&M. You can purchase that here
Let's get started!
Open a new canvas 600x600
Open Element 96
Copy>Paste>Paste as new layer
Resize as needed
Place in the center of your canvas
Open Paper 10
Copy>Paste>Paste as new layer
Resize as needed
Delete excess around frame edges
Add your tube
Open Element 30
Copy>Paste>Paste as new layer
Resize as needed
Make this your bottom layer for now
Add drop shadow
Open Element 16
Copy>Paste>Paste as new layer
Down size as much as needed
Place near the bottom of your frame
Add drop shadow
Open Element 35
Copy>Paste>Paste as new layer
Resize as needed
Place near the bottom of your frame layer
Add drop shadow
Open Element 39
Copy>Paste>Paste as new layer
Resize as needed
Place near the top of your frame
Open Element 43
Copy>Paste>Paste as new layer
Resize as needed
Place near the bottom of your frame
Add drop shadow
Open Element 58
Copy>Paste>Paste as new layer
Down size as needed
Place under your paper layer
Move to the far right of your canvas
Add drop shadow
Open Element 61
copy>Paste>Paste as new layer
Resize as needed
Rotate to your desire
Place under your paper layer
move to the top far left
Add drop shadow
Open Element 4
Copy>Paste>Paste as new layer
Down size as desired
Place above your frame layer
Add drop shadow
Open Element 72
Copy>Paste>Paste as new layer
Resize as needed
Place below your Element 4 layer
Open Element 88
Copy>Paste>Paste as new layer
Resize
Place near the top of your frame
Add drop shadow
Add your name text
Add your copyright and watermark
You should have something similar to my example
~Thank you for using my tutorial~
New Kit~Sarcasm

New Kit now available at all my stores!
$2.50
With the exception of sales going on at a few of my stores
March 20, 2012
New Freebie Kit

New Awareness freebie kit!
Feel free to download from my freebie blog here
Includes:
34 Elements
6 papers
March 18, 2012
PTU Sweet But Deadly Tutorial

This tutorial is 100% my creation, any resemblance to any other tutorial is coincidence and not intentional.
Written: 3/18/12
You must have basic knowledge of PSP
I used the artwork of Verymany. You must have a license to use Verymany's artwork. You can get that and purchase his artwork here
Scrap kit by Inspired Creationz called Sweet but deadly. You can purchase that here
Let's get started!
Open a new canvas 600x600
Open Frame 1
Copy>Paste>Paste as new layer
Resize as needed
Place in the center of your canvas
Open Paper 1
Copy>Paste>Paste as new layer
Resize as needed
Place under your frame layer in your layers box
Delete excess around your frame layer
Add your tube
Delete any excess neccessary
Open Paper 10
Resize to 600*600
Choose your mask
Layers>New Mask Layer
Choose your mask you opened>Apply
Merge>Merge group
Copy>Paste>Paste as new layer
Make this your bottom layer
Open License Plate
Copy>Paste>Paste as new layer
Resize as needed
Move to the bottom of your frame layer and rotate
Open Cocktail
Copy>Paste>Paste as new layer
Resize as needed
Place under your license plate layer
Open Flower 1
Copy>Paste>Paste as new layer
Resize as desired
Move to the right of your frame layer
Add drop shadow to your flower element
Open Kitty 4
Copy>Paste>Paste as new layer
Resize as needed
Place near the bottom of your frame layer
Add drop shadow
Add your name text
Add your copyright and watermark
You should have something similar to my example
~Thank you for using my tutorial~
March 17, 2012
New Kit~Spring Fever

New kit now available in all my stores
Only $2
Only $2
Includes:
40 Elements
40 Elements
8 Papers
March 16, 2012
New Kit~Waves

New Kit available in all my stores!
Only $1
March 15, 2012
PTU Midnight Blues Tutorial

This tutorial is 100% my creation, any resemblance to any other is coincidence and not intentional.
Written: 3/15/12
You must have basic knowledge of PSP
I used the artwork of Barbara Jensen. You must have a license to use her work. This particular tube was purchased from Scraps n Crap which you can find here
Scrap Kit is called Midnight Blues by Rabid Designz. You can purchase her scrapkit here
Let's get started!
Open a new canvas 600*600
Open frame4
Copy>Paste>Paste as new layer
Resize as needed
Place in the center of your canvas
Open Paper2
Copy>Paste>Paste as new layer
Resize as needed
Delete excess around inner frame edges
Open Paper7
Copy>Paste>Paste as new layer
Resize as needed
Delete paper from inner large area of your frame layer
Then delete any excess over lapping your outer frame edge
Add your tube
Resize as needed
Place as desired
Open Element 11
Copy>Paste>Paste as new layer
Resize as needed
Place near the top of your frame layer
Open Element 10
Copy>Paste>Paste as new layer
Resize smaller than your Element 11
Place nest to your Element 11 on your canvas
Open Element 12
Copy>Paste>Paste as new layer
Resize as needed
Move to the left of your frame layer
Make this your bottom layer for now
Refer to my example
Add your name text
Add your copyright and watermark (if applicable)
You should have something similar to my example
~Thank you for using my tutorial~
March 14, 2012
New Kit~Rabid Bunny

New kit now available in all my stores for only $3
Includes:
58 Elements
12 Papers
Includes:
58 Elements
12 Papers
PTU The Key to my Heart Tutorial

This tutorial is 100% my creation, any resemblance to any other is coincidence and not intentional.
Written: 3/14/12
You must have basic knowledge of PSP
I used the artwork of Alicia Mujica. You must have a license to use her work. You can get that and her work here
I used the scrap kit The Key to my Heart by Wicked Princess Scraps. You can purchase that here
Let's get started!
Open a new canvas 600x600
Open wrapframe
Copy>Paste>Paste as new layer
Resize as needed
Place in the center of your canvas
Open PP2
Copy>Paste>Paste as new layer
Resize as needed
Delete excess around frame edges
Add your tube
Resize as need
Place to your desire
Add drop shadow to your tube
Open PP9
Resize to 600*600
Open your mask
Select your paper
Layers>New mask Layer>Choose the name of your mask and apply
Merge>Merge group
Copy>Paste>Paste as new layer
Make this your bottom layer
Open ButterflyTrail
Copy>Paste>Paste as new layer
Do not resize
Place under your first paper layer to the right of your frame layer
Open Bow
Copy>Paste>Paste as new layer
Resize as needed
Rotate as desired
Place in the top right corner of your frame
Open Butterfly 3
Copy>Paste>Paste as new layer
Resize as needed and place near your bow
Open Cello
Copy>Paste>paste as new layer
Resize as needed
Place near the bottom of your frame layer
Open DiamondFlower
Copy>Paste>Paste as new layer
Resize as needed
Place under your bow layer
Open Flower1
Copy>Paste>Paste as new layer
Resize as needed
Place below your Diamond Flower
Add your name text
Add your copyright
Now you should have something similar to my example
~Thank you for using my tutorial~
March 11, 2012
PTU Toxic Tutorial

This tutorial is 100% my creation, any resemblance to any other is coincidence and not intentional.
Written: 3/11/12
You must have basic knowledge of PSP
I used the artwork of Zindy. You must have a license to use her work. You can get that and purchase her work here
Scrapkit by PinkCandyDesigns called Toxic which you can purchase here
Let's get started!
Open a new canvas 600x600
Open frame2
Copy>Paste>Paste as new layer
Resize as needed
Place in the center or your canvas
Open PP9
Copy>Paste>Paste as new layer
Resize as needed
Delete excess around frame edges
Add your tube and delete excess
Open bear
Copy>Paste>Paste as new layer
Resize as needed
Place as desired
Open beads2
Copy>Paste>Paste as new layer
Resize as needed
Place over the top of your frame layer
Open PP7
Open your chosen mask
Select your paper
Layers>New mask layer>from image
Select the name of your mask>apply
Merge>Merge group
Copy>Paste>Paste as new layer
Resize as needed
Make this your bottom layer
Open fluffyheart
Copy>Paste>Paste as new layer
Resize as needed
Place over the left of your frame layer
Open fluffyheart
copy>Paste>Paste as new layer
Do not resize or move
Add your copyright
Add your watermark if you have one
Add your name text
Now you should have something similar to my example
~Thank you for using my tutorial~
Vampires Kiss Cluster Frame Freebies

March 6, 2012
"Get Lucky" Snags
Here are some snaggables I made with my friend Melissa aka Rabidbunny's kit Get Lucky.
You can purchase her kit here at Twilight Scraps


March 5, 2012
PTU Greed Tutorial


This tutorial is 100% my creation, any resemblance to any other is coincidence and not intentional.
Written: 3/5/12
You must have basic knowledge of PSP
I used the artwork of Anna Marine. You must have a license to use her work. You can get that and purchase her work here
Scrap kit by Mellows Graphics called Greed. You may purchase that here
Let's get started!
Open a new canvas 600x250
Open paper4
Open your Materials Properties window
Select your pattern tab
Make paper 4 your pattern
Apply
Flood fill your canvas with paper 4 pattern
Selections>Select all
Selections>Modify>Select Selection Borders
Size: 7
Select>Float
Flood fill with desired color
Effects>Plugins>Penta.com>Color dot
Apply desired settings
Select>Defloat
Select>Select none
Add your tube
Delete excess around border
Open Diamond Bling 1
Copy>Paste>Paste as new layer
Do not resize
Move to the far left of your canvas
Duplicate
Move directly beside it near the middle of your canvas
Add your name text
Add your copyright
You should have something similar to my example
Now for the avatar!
Open a new canvas 150x200
Flood fill with paper4 pattern
Repeat previous steps for border
Add your tube
Delete excess
Add your name initial
Add your copyright
You should have something similar to my example
~Thank you for using my tutorial~
March 4, 2012
PTU Elegant Soiree Tutorial


This tutorial is 100% my creation, any resemblance to any other is coincidence and not intentional.
Written: 3/4/12
You must have basic knowledge of PSP
I used the artwork of Anna Marine. You must have a license to use her work. You can get that and purchase her work here
Scrap kit by Wicked Princess Scraps which you can purchase here
Let's get started
Open a new canvas 600x250
Open Paper4
Open your Materials Properties window
Choose your pattern tab
Choose your Paper 4 pattern>Apply
Flood fill your canvas with your Paper 4 pattern
Selections>Select all
Selections>Modify>Select Selection Borders
Size: 7
Select>Float
Make a gradient of choice or select one color
Flood fill your selected border
Adjust>Add/remove Noise>Add noise
Add desired settings>Apply
Selections>Defloat
Selections>Select none
Add your tube
Delete excess
Open Rosevine
Copy>Paste>Paste as new layer
Resize as needed
Place on the right side of your canvas
Delete excess
Add your name text
Add your copyright
Now you should have something similar to my example
Now for the avatar!
Open a new canvas 125x200
Flood fill with previous pattern
Add your border following previous steps
Add your tube
Delete excess
Add your initial text
Add copyright
Now you should have something similar to my example
~Thank you for using my tutorial~
Subscribe to:
Posts
(Atom)
I CT For


CU4CU License


")

