


April 30, 2012
Come Follow Me
Come follow me for more updates on my products!!!!
April 28, 2012
PTU Soft Dreams Tutorial

This tutorial is 100% my creation, any resemblance to any other is coincidence and not intentional.
Written: 4/28/12
Supplies needed:
VM Natural~Ripper
Scrap Kit of Choice
Tube of choice
Font of choice
I used the artwork of Suzanne Woolcott. You must have a license to use her work. You can get that and her tubes here
Scrap Kit by Chi Chi Designz called Soft Dreams. You can purchase that here
Let's get started!
Open a new canvas 600x250
Open Paper10
Flood fill your canvas with your paper 10 pattern
Add your tube
Duplicate twice
Place duplicates under your main tube in your layers box
Move duplicates to either side of your main tube
Go to your layer properties/blending mode
Apply Overlay to each duplicate tube
Add a new raster layer
Make this your top layer for now
Selections>Select All
Selections>Modify>Select Seletions borders
Size: 7
select your layer your just added your border to and flood fill with #feab99
Selections>Float
Effects>Plugins>VM Natural>Ripper
Use these settings:

Open Flower Frame
Copy & Paste
Resize as needed
Place under your main tube
Add your name text
Add your copyright
Now you should have something similar to my example
Repeat the steps with a canvas size of 150x150 for an avatar
Do not add the frame to it
~Thank you for using my tutorial~
April 27, 2012
Lafayette Scrap Kit Freebie
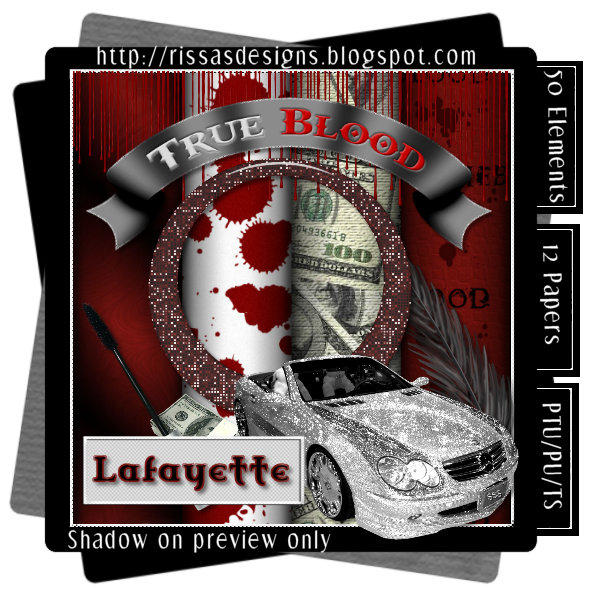
I made this a while back and thought I would offer it as a freebie
You can download it here
*if you download please leave me a comment here or in my chatbox*
April 26, 2012
Mask Set 5-12

My second set of masks. There are 8 masks in this set
You can download them from my freebie blog here
*Please if you download leave me a comment either on my post or in my chatbox*
Thank you!
April 24, 2012
New Kit Now Available

New kit now available in my stores
Includes:
28 Elements
12 Papers
April 23, 2012
Ruby & The Wolf Tag

Here is a show off tag I made using my bestie Kate's kit Ruby & the Wolf. You can find her work on her blog here
April 22, 2012
PTU Sex On The Beach Tutorial

This tutorial is 100% my creation, any resemblance to any other is coincidence and not intentional
Written: 4/22/12
Scrap Kit by Irish Bitch Designs called Beach Party. You can find it here
Artwork by Ismael Rac. You can purchase his work here, you must have a license to use his work.
Let's get started
Open a new canvas 600x600
Open Ribbon Frame
Copy & Paste
Resize 63%
Place in the center of your canvas
Open Paper 14
Copy & Paste
Place under your frame
Resize as needed
Delete excess around frame edges
Select your paper layer
Effect>Texture effects>Mosaic glass
Apply these settings

Add your full layered tube
Open your Close Up tube layer
Copy & Paste
Resize if needed
Place under your fame layer
Set your Layer Properties to Luminance
Open Paper 11
Do NOT copy
Open your selected mask
Select your paper again
Resize to 600x600
Layers>New Mask Layer>From Image
Select the name of your mask and apply
Merge group
Copy & Paste
Make this your bottom layer
Resize if needed
Position to your desire
Open Drink
Copy & Paste
Resize to your desire
Move the the lower left corner of your frame
Add drop shadow
Open Beach Ball
Copy & Paste
Resize 19%
Move near your drink
Add drop shadow
Open Crab
Copy & Paste
Resize 19%
Move to the top left area of your frame
Add drop shadow
Open Life Preserver2
Copy & Paste
Resize 50%
Place under your paper layer
Move to the top right corner of your frame
Add drop shadow
Open Ribbon 4
Copy & Paste
Resize 48%
Place under your paper layer
Open WordArt 3
Copy & Paste
Resize 50%
Place near the bottom right of your frame
Add drop shadow
Open Flair
Copy & Paste
Resize to your desire
Place near beach ball
Add drop shadow
Add your copyright
Add your name text
You should have something similar to my example
~Thank you for using my tutorial~
April 21, 2012
PTU Merry Tutorial

This tutorial is 100% my creation, any resemblance to any other is coincidence and not intentional
Written: 4/21/12
Scrap Kit by Sleek n Sassy Designs. You can find it for purchase here
Let's get started
Open a new canvas 600x600
Open frame 6
Copy & Paste into your canvas
Resize as needed
Move to the center of your canvas
Open Paper 4
Copy & Paste into your canvas
Move under your frame
Resize as needed
Delete excess around your frame edges
Open MerryCustom2
Copy & Paste into canvas
Resize as needed
Place near the left side of your frame
Open Paper 7
Open your chosen mask
Layers>New Mask Layer>From Image
Select the name of your mask and apply
Merge group
Copy & Paste
Make this your bottom layer
Open Element 4
Copy & Paste
Resize 30%
Place near the bottom right corner of your frame layer
Open Element 7
Copy & Paste
Resize 40%
Rotate if desired
Place near the top of your frame layer under your paper layer
Add drop shadow if desired
Open Element 11
Copy & Paste
Resize 45%
Place under your Element 4 layer
Open Element 27
Copy & Paste
Place under your paper layer near the bottom of your frame layer
Resize 70%
Add your Poser copyright
Add your name text
You should have something similar to my example
~Thank you for using my tutorial~
Masks 1-4
Here is my first try at making masks. There are 4 of them in the set
#1

#2

#3

#4

You can download the set here
*Please leave a comment in my chatbox if you download*
New Splatter Papers

10 Splatter Papers available in stores for purchase
Only $1.25
April 20, 2012
PTU Magick In The Woods Tutorial

This tutorial is 100% my creation, any resemblance to any other is coincidence and not intentional
Written: 4/20/12
Scrapkit by Wicked Princess Scraps called Magick In The Woods. You can purchase that here
Artwork by Arthur Crowe. You must have a license to use his work. I purchased this at PTE but you can now find his tubes here
Let's get started!
Open a new canvas 600x250
Open PP2
Open your materials window
Select your pattern tab
Make your PP2 your pattern
Flood fill your canvas with your paper
Select all
Effects>Plugins> AAA Frames>Fotoframe
Width-10
All other settings-0
Opacity-100
Add your tube
Open FloweredPray
Copy>Paste>Paste as new layer
Place to your desire
Delete any excess
Duplicate
Image>Mirror
Add dropshadow if desired
Add your copyright
Add your name text
You should have something similar to the example
~Thank you for using my tutorial~
April 17, 2012
New Kit~Paint My World

New kit available in all my stores tonight
Only $2.25
April 15, 2012
New Kit~Belle

New kit now available in all my stores
April 14, 2012
New Overlay Pack

New Overlay pack now available in select stores
Only $1.50
April 12, 2012
PTU Dancing In the Moonlight Tutorial

This tutorial is 100% my creation, any resemblance to any other is coincidence and not intentional.
Written: 4/12/12
You must have basic knowledge of PSP
Scrap kit is by Broken Sky Dezine's called I'm Not Broken. You may purchase that here
I used the artwork of Verymany. You must have a license to use his work. You may get that and purchase his work here
Let's get started!
Open a new canvas 6000x600
Open BSD21
Copy>Paste>Paste as new layer
resize as needed
Place in the center of your canvas
Open Paper BSD1
Copy>Paste>Paste as new layer
Resize as desired
Place under your frame layer
Delete excess around frame edges
Add your tube
Open Paper BSD5
Resize to 600x600
Open your mask of choice
Layers>New Mask layer>From Image
Apply your mask
Merge>Merge Group
Copy>Paste>Paste as new layer
Resize as needed
Make this your bottom layer
Open Element BSD7
Copy>Paste>Paste as new layer
Downsize to your desire
Place in the bottom right corner of your frame layer
Open BSD16
Copy>Paste>Paste as new layer
Do not resize
Place under your main paper layer near the top left of your frame layer
Open BSD47
Copy>Paste>Paste as new layer
Downsize to your desire
Image>Mirror
Delete excess you don't want
Duplicate
Image>Mirror
Move above your previous layer
Refer to example
Open BSD35
Copy>Paste>Paste as new layer
Place under your moon layer
Do not resize
Add your copyright and watermark
Add your name text
Add your wordart if desired
You should have something similar to my example
~Thank you for using my tutorial~
April 11, 2012
New Kit in Stores!!!!

New Kit now available in all my stores!!!
Only $1
April 5, 2012
PTU Bullet Proof Tutorial

This tutorial is 100% my creation, any resemblance to any other is coincidence and not intentional.
Written: 4/5/12
You must have basic knowledge of PSP
Scrap Kit by Wicked Creationz Scraps called Silver Bullet. You can purchase that here
I used the artwork of Arthur Crowe which you can now find here. You must have a license to use his work.
I previously purchased this at PTELet's get started!
Open a new canvas 600x600
Open Frame 4
Copy>Paste>Paste as new layer
Resize as desired
Place in the center of your canvas
Open Paper 2
Copy>Paste>Paste as new layer
Place under your frame layer
Resize as needed
Delete excess around frame edges
Add your tube as desired
Open Stars
Copy>Paste>Paste as new layer
Place to the far left top corner under your paper layer
Duplicate>
Image>Mirror
Duplicate
Image>Flip
Duplicate
Image>Mirror
Open Paper 6
Resize to 600x600
Open your chosen mask
Select you paper layer
Layers>New Mask layer
Apply
Merge>Merge group
Copy>Paste>Paste as new layer
Resize as needed
Make this your bottom layer
Open Barbwire
Copy>Paste>Paste as new layer
Place under your paper layer
Move the the left near the bottom of your frame
Duplicate
Move your duplicate layer to the right at the bottom of your frame layer
Open Bullet Proof Kitty
Copy>Paste>Paste as new layer
Resize as desired
Place near the bottom left corner of your frame layer
Refer to example
Apply drop shadow if desired
Add your copyright
Add your name text
Add wordart if desired
You should have something similar to my example
~Thank you for using my tutorial~
April 3, 2012
Jackie~Snags
Here are some snaggables using a scrap kit by Wicked Princess Scraps called Jackie
You can find it here
You can find it here


April 1, 2012
Simple Mask Tutorial
Open your desired paper
Go to Image>Canvas Size> Resize your paper to 500x500 (or size of your main canvas)
Open your mask you want to use
Select your paper again
Go to Layers>New Mask Layer>From Image
A new window should open
Under Source Window select the name of your mask and click ok
Your mask should apply to your paper now
Go over to your Layers window on the right side of your PSP
right click your paper, scroll down to merge>Merge group
Now you Copy>Paste>Paste as new layer
Move this down to make it your bottom layer
You can scale or resize if you need
PTU Easter Bunny Tutorial

This tutorial is 100% my creation, any resemblance to any other is coincidence and not intentional.
Written: 4/1/12
You must have basic knowledge of PSP.
Scrap kit by Pink Candy Designs called Easter Bunny. You may purchase that here
I used the artwork of Zindy. You must have a license to use her work. You may get that and her tubes here
Let's get started!
Open a new canvas 600x600
Open frame
Copy>Paste>Paste as new layer
Resize if needed
Place in the center of your canvas
Open Paper 4
Copy>Paste>Paste as new layer
Resize as needed
Place under your frame alyer
Delete excess paper around frame edges
Add your tube to each side of frame
(Refer to my example)
Set opacity to around 65 on your right tube
Add drop shadow to your left tube
Open Paper 9
Resize to 600x600
Choose your mask
Layers>New Mask Layer>Apply chosen mask
Merge>Merge group
Copy>Paste>Paste as new layer
Make this your bottom layer
Resize if desired
Open basket
Copy>Paste>Paste as new layer
Downsize to your desire
Place in the center between the two frames
Add a small drop shadow
Open balloons
Copy>Paste>Paste as new layer
Downsize to your desire
Place under your main paper layer
Add drop shadow
Open beads 2
Copy>Paste>Paste as new layer
Downsize to your desire
Place over your frame layer to the far right
Open eggs
Copy>Paste>Paste as new layer
Downsize
Place on one side of your basket
Duplicate
Place your duplicate layer on the other side of your basket
Open ribbon
Copy>Paste>Paste as new Layer
Resize as desired
Place under your basket layer
Add drop shadow
Add your copy right and watermark
Add your name text
You should have something similar to my example
~Thank you for using my tutorial~
Subscribe to:
Posts
(Atom)
I CT For


CU4CU License


")

