


December 27, 2011
PTU: Charm School Tutorial

This tutorial is 100% my creation, any resemblance to any other is coincidence and not intentional.
You must have basic knowledge of PSP
Scrapkit by Digicats & Dogs. You can purchase it here
Let's get started!
Open new canvas 600x600
Open Frame07
Copy>Paste>Paste as new layer
Resize: 80
Position in the center or you canvas
Open Paper22
Copy>Paste>Paste as new layer
Resize as needed and place under your frame layer
Delete excess paper around your frame layer
Open Poser 1
Copy>Paste>paste as new layer
Resize: 60
Make this your top layer for now
Move to the far right of your frame layer
Refer to example
Open elements Ruin Stones
Copy>Paste>Paste as new layer
Resize: 20
Place near the lower left corner of your frame layer
Open element Spell
Copy>Paste>Paste as new layer
Make this your bottom layer
Resize: 85
Open element Potions01
Copy>Paste>Paste as new layer
Resize: 35
Place near your Ruin Stones layer
Refer to example
Open Paper07
Layers>Load/Save Mask>Load mask from disk
Choose your mask and apply
Merge>Merge group
Copy>paste>Paste as new layer
Make this your bottom layer
Resize as needed
Add copyright info
Add name text
You should have something similar to my example
~Thank you for reading/using my tutorial~
December 23, 2011
Templates 12 & 13


Templates 9, 10 & 11


December 18, 2011
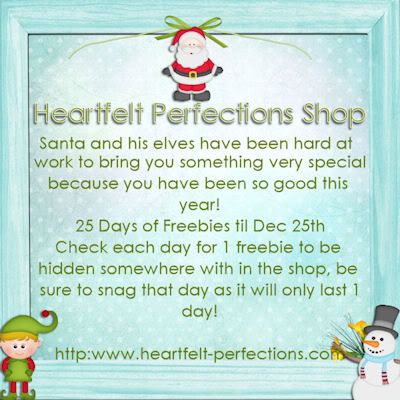
Sale @ Heartfelt Perfections Shop

December 17, 2011
New Kit in Stores: Gold Christmas

Now available at Inspirations of Scrap Friends, Scrappin Naturally, and RBL Designz
PTU Chilly Delight Tutorial


This tutorial is 100% my creation, any resemblance to any other is coincidence and not intentional.
You must have basic knowledge of PSP
Scrap Kit by Alika's Scraps. You can purchase it here
I used the artwork of the wonderful Keith Garvey. You must have a license to use his work. You can purchase is artwork here and request a license.
Lets get started!
Open a new canvas 600x250
Open as_paper01
Open your Materials window
Choose your pattern tab
Select the paper01 pattern and click ok
Choose your flood fill tool
Flood fill your canvas with your pattern
Now lets add a border
Selections>Select all
Selections>Modify> Select Selection borders> Size 8
Selections>Float
Fill selected border with color of choice
Apply an effect if desired
Selections>Defloat
Selections>Select None
Choose your tube>Open
Copy>Paste>Paste as new layer
Position in the center of your canvas>Delete excess around border
Dupliate twice
Place both layers under your original tube layer
Choose your first duplicate layer>Image>Mirror
Delete excess tube layer after repositioning your tube to your liking
Set your Opacity to around 40
Move your second duplicate layer to the other side of your canvas to your liking
Delete excess tube layer around border
Set Opacity to around 40
Open as46
Copy>Paste>Paste as new layer
Resize: 40
Place in your top left corner of your canvas
Delete excess around border
Repeat for other 3 corners
Refer to example
Open as31
Copy>Paste>Paste as new layer
Resize: 30
Place under your tube layers and a little off center of your canvas
Duplicate>Image>Mirror
Add your name text
Add your word art of choice
Add your copyright if required
You should have something similar to my example!
Now for the avatar!
Open a new canvas 150x200
Flood fill with your paper pattern
Repeat border steps from above
Place your tube layer as desired
Add an as46 element
Place in the top left corner, resize to your liking
Delete excess
Add name or initial text
Add copyright
Now you should have something similar to my example
~Thank you for reading/using my tutorial~
December 14, 2011
PTU Dark Side of the Icicle

This tutorial is 100% my creation, any resemblance is coincidence and is not intentional.
You must have basic knowledge of PSP
Scrap Kit by Alikas Scraps called Dark Side of the Icicle. You can purchase that here
Art work by Ana Rasha, you can find her on deviantart.com
Download wordart here
Let's get started!
Open a new canvas 650x650
Open as36
Copy>Paste>Paste as new layer
Resize: 70
Move to the top left of your canvas
Open as37
Copy>Paste>Paste as new layer
Resize: 60
Rotate: 34
Adjust as you desire or refer to example
Open paper04
Copy>Paste>Paste as new layer
Place under your as36 layer
Resize as needed
Delete excess paper around the edges of the frame
Open paper03
Copy>Paste>Paste as new layer
Place under your as37 frame layer
Resize as needed
Delete excess paper around the edges of the frame
Add your 2 tubes of choice or 1 and duplicate it
Open paper12
Layers>Load/save Mask>Load Mask from disk
Choose your mask>Apply
Merge>Merge group
Copy>Paste>Paste as new layer
Resize as needed
Make this your bottom layer
Open as07
Copy>Paste>Paste as new layer
Resize: 40
Place as desired
Open as08
Copy>Paste>Paste as new layer
Resize: 40
Place as desired
Open your wordart
Colorize it to your liking
Merge>Copy>Paste>Paste as new layer
Resize as needed
Open as15
Copy>Paste>Paste as new layer
Resize: 80
Place near the leftside of your canvas
Open as30
Copy>Paste>Paste as new layer
Resize: 70
Place this above your mask layer
Open as19
Copy>Paste>Paste as new layer
Resize and place as desired
Open as66
Copy>Paste>Paste as new layer
Resize and place as desired
Add your name text
Add your copyright if needed
~Thank you for reading/using my tutorial~
PTU Uncolored Elegance

This tutorial is 100% my creation, any resemblance to any other is coincidence and not intentional.
You must have basic knowledge of PSP.
Scrapkit by KnC called Uncolored Elegance. You can purchase that here
I used the FTU work of Bez Boardman.
Open new canvas 650x650
Open frame
Copy>Paste>Paste as new layer
Resize: 75
Place in the center of your canvas
Open pp4
Copy>Paste>Paste as new layer
Resize as needed and make this your bottom layer
Add your tube
Open element1
Copy>Paste>Paste as new layer
Resize as needed and place near the left side of your frame layer
Open Feather1
Copy>Paste>Paste as new layer
Resize as needed and move to the left side of your frame layer
Add your mask layer
Add your name text
Add you copyright if required
You should have something similar to my example
~Thank you for reading/using my tutorial~
December 12, 2011
FTU Joyous Tutorial

This tutorial is 100% my creation, any resemblance to any other is coincidence and not intentional.
Scrap Kit by Shani of Wicked Princess Scraps. You can down load it here
I used the artwork of Ismael Rac. You can purchase it here and you must have a license to use his work.
Open a new canvas 650x650
Open WP_JOY_FRAME
Copy>Paste>Paste as new layer
Resize: 80
Position in the center of your canvas
Open WP_JOY_pp11
Copy>Paste>Paste as new layer
resize as needed
Choose your wand tool
Select the inner area of your frame layer
Selections>Invert
Choose your paper layer>Delete
Selections>Select None
Open your tube of choice
Copy>Paste>Paste as new layer
Delete excess tube
Open WP_JOY_TREEORNAMENT
Copy>Paste>Paste as new layer
Resize: 50
Position near the bottom right corner of your frame layer
Open WP_JOY_HEARTORNAMENT
Copy>Paste>Paste as new layer
Resize: 40
Move to the top left side of your frame layer
Open WP_JOY_pp10
Layers>Load/Save Mask>Load Mask from disk
Choose your mask>Apply
Merge>Merge group
Copy>Paste>Paste as new layer
Make this your bottom layer
Resize as needed
Add your name text
Add your copyright(if needed)
You should have something similar to my example
~Thank you for reading/using my tutorial~
December 11, 2011
New Kit in Stores: Hot Guitar

Now available in stores!
$1.75 at RBL Designs and Inspirations of Scrap Friends
December 10, 2011
New Blog Design
So I decided that I needed a winter(y) type theme to go with the season :)
I found this FTU kit on Designs by Vaybs blog and made the header and background from it.
Enjoy:)
December 8, 2011
New Kit in Stores: Onyx
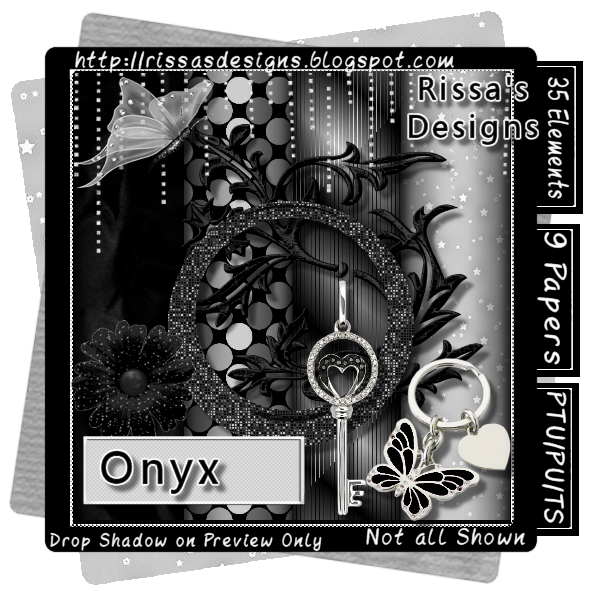
My newest kit is called Onyx and is now available at RBL Designs and Inspirations of Scrap Friends. Only $1.75.
December 7, 2011
PTU Emerald Tutorial

December 3, 2011
New Kit in Stores: Cupcake Fancy

You can find this kit in all my stores :)
Now available
PTU Rain Drops on My heart Featuring FallnAngel's Tube Waiting

This tutorial is 100% my creation, any resemblance to any other is coincidence and not intentional.
You MUST have basic knowledge of PSP.
I used the beautiful kit by Karra's Kreative Korner called Rain Drops on My heart. You can purchase it here
I used the artwork of FallnAngel called Waiting. You can purchase her work here
Open a new canvas 600x600
Open Frame2
Copy>Paste>Paste as new layer
Resize: 80
Open Paper8
Copy>Paste>Paste as new layer
Resize as needed
Choose your wand tool
Select your Frame layer>Select the inner area of your frame layer
Selections>Invert
Choose your paper layer>Delete
Selections>Select none
Open your tube layer
Copy>Paste>Paste as new layer
Place and resize as desired
Open Flower3
Copy>Paste>Paste as new layer
Resize: 70
Move to the lower right corner of your frame layer
Refer to example
Open Glitter Scroll
Copy>Paste>Paste as new layer
Resize: 55
Make this your bottom layer
Place near the top left corner of your canvas
Refer to example
Duplicate
Image>Mirror
Open Heart2
Copy>Paste>Paste as new layer
Move the the bottom left corner of your frame layer
Resize: 55
Open Paper5
Add your mask
Merge group
Copy>Paste>Paste as new layer
Resize as needed
Make this your bottom layer
Add your copyright
Add your name text
You should have something similar to my example
~Thank you for reading/using my tutorial~
December 2, 2011
Christmas Past Cluster Frame Freebie

December 1, 2011
Creatively Scrappin Blog Train: Christmas Presents

Subscribe to:
Comments
(Atom)
I CT For


CU4CU License


")

