


September 14, 2011
Tutorial: And With One Finger

This tutorial is of my own creation any resemblance to any other tutorial is purely coincidence and was not intentional. This tutorial is for personal use only!!
I am using the work of Jose Cano. You can find his workhere. You MUST have a license to use his art.
Text: Montgomery
You can download my template here
Scrapkit I used the work of Black Widow Creations, you can download the kit here
Open your template.
Delete layer Vector 7
Now that you have done that let's get started, shall we??
Ok, let's go!!!
Click on "Layer 1" and use your wand tool and select Layer 1 then invert selection. (shift+alt+I)
Open Paper 7, copy, paste>paste into selection
Select none. (ctrl+D)
Now choose "Layer 2" and use your wand tool and select Layer 2 then invert selection.
Paste Paper 7 into selection.
Select none.
Now if you choose delete Layers 1 & 2.
You should have something that looks like this.

Open Paper 8.
Choose "Vector 2", use your wand tool and select strip 1.
(closet to the large circles)
Copy Paper 8, paste>paste into selection.
Select none.
Repeat for strips 3 & 5.
Open Paper 6.
Choose strip 2 with your wand tool.
Copy Paper 6 and paste>paste into selection.
Select none.
Repeat for strip 4.
Select layer "Raster 6".
Flood fill tool.
Bring up your Material properties.
Color # to enter #40f200, click ok.
Flood fill layer "Raster 6"
Adjust>Blur>Gauassion Blur.
Radius 3.
Open Paper 5.
Select layer "Raster 2"
Only half the arrow will highlight!
Copy Paper 5, paste>paste into selection.
Select none.
Repeat for the 2 small strips of the arrow.
You should now have something that resembles this:

Flood fill word art as desired!
Open tube of choice.
Copy desired layer>paste>paste as new layer.
Resize to your liking.
Duplicate tube layer.
Move copy to be positioned above layer "Vector 3"
Duplicate once more.
Resize to your liking and move to above "Vector 1" and below "Raster 8"
Choose your wand tool and select layer "Vector 1"
Invert Selection.
Delete.
Select none.
Adjust Opacity down to around 55.
Open Element 23.
Copy>paste>paste as new layer.
Resize as you see fit then move to left side.
Open Element 4.
Copy>paste>paste as new layer.
Other Elements I used and place them to your satisfaction:
Element 33
Element 50
Select your text tool.
Choose your text.
Choose your color. (I used #55dd01)
Apply desired name and size.
Effects>3D Effects>Inner Bevel
Use these settings:
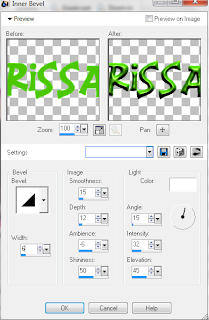
Smoothness: 15
Depth: 12
Ambience: -6
Shininess: 50
Angle 15
Intensity: 32
Elevation: 45
Width: 6
Depth: 12
Ambience: -6
Shininess: 50
Angle 15
Intensity: 32
Elevation: 45
Width: 6
Select Raster 13
Effects>3D Effects>Drop Shadow
Use these settings:

Offset Vertical: 8
Horizontal: 8
Attributes: Opacity: 50
Blur: 2
color: black
Horizontal: 8
Attributes: Opacity: 50
Blur: 2
color: black
Add your copyright.
You should have something like my example at the top.
Thank you for taking time to use/read my tutorial.
Subscribe to:
Post Comments
(Atom)
I CT For


CU4CU License


")


0 comments:
Post a Comment