October 29, 2011
PTU Who's That Chick Tutorial

This tutorial is 100% my creation, any resemblance to any others is coincidence and not intentional in any way.
You Must have basic knowledge of PSP.
Scrapkit is called Who's That Chick by Scrazy Scraps. You can purchase it here
Tube is by Elias Chatzoudis. You must have a license to you his work. You can get your license and purchase his work here
Open a new canvas 600x600
Open element frame01
Copy>Paste>Paste as new layer
Resize: 75
Open Paper 11
Copy>Paste>Paste as new layer
Place below your frame layer and resize to fit in your canvas layer
Choose your wand tool
Choose your frame layer>Select the inner portion of your frame layer>Invert
Choose your paper layer>Delete>Select none
Open your tube
Copy>Paste>Paste as new layer
Resize as needed
Place as your top layer and in the center of your frame layer
(refer to example)
Open element06
Copy>Paste>Paste as new layer
Resize: 25
Move to the top left corner of your frame layer
Duplicate
Image>Mirror
Open element14
Copy>Paste>Paste as new layer
Resize: 30
Place under your tube layer in your layer tab
Image>Free rotate
Move to the far left bottom corner
Use these settings:
Open element 16
Copy>Paste>Paste as new layer
Make this your bottom layer
Resize: 96
Duplicate your tube layer
Adjust>Blur>Gaussian Blur
Radius: 3
Layer Properties>Soft Light
Choose bottom tube layer
Effects>3D Effects>Drop Shadow
Use these settings:
Offset:
Vertical: 6
Horizontal: 6
Attributes:
Opacity: 50
Blur: 5
Color: Black #000000
Add the text (Sweet and Sassy) or whatever you want
Add your name text
Add your copyright
Now you should have something similar to my example
Thank you for reading/using my tutorial! Have a wonderful day:)
Labels:CT,PTU tutorial,Tutorials | 0
comments
October 24, 2011
PTU Totally Zirconia Tags
Labels:CT | 0
comments
October 20, 2011
PTU Ocean Breeze Tutorial

This tutorial is 100% my creation, any resemblance to any other tutorial is coincidence and not intentional.
You must have basic knowledge of PSP
I used a scrapkit called Ocean Breeze by Disyas Digital Designs. You can purchase it here
Tube is by Ismael Rac. You must have a license to use his work. You can purchase his work here and request your license.
Text: Odyssey
Open a new canvas 600x600
Open Frame Disyas_OceanB_Fr8
Copy>Paste>Paste as new layer
Open Disyas_OceanB_P10
Layers>Load/Save Mask>Load Mask from Disk
Choose your mask and apply
Right click your paper layer>Merge>Merge group
Copy>Paste>Paste as new layer
Make this your bottom layer
Open your tube layer
Copy>Paste>Paste as new layer
Resize as needed
Place as desired or refer to example
Place as desired or refer to example
Open Disyas_OceanB_E4
Copy>Paste>Paste as new layer
Resize: 40
Move to the lower right corner of your frame layer
Open Disyas_OceanB_E7
Copy>Paste>Paste as new layer
Resize: 40
Place it above your sailboat layer
Position to the left of it to overlap it
Open Disyas_OceanB_E6
Copy>Paste>Paste as new layer
Resize: 45
Make your top layer
Move to the left lower corner
Add drop shadow
Settings:
Offset:
Vertical: 5
Horizontal: 5
Attributes:
Opacity: 50
Blur: 5
Color: Black #000000
(Do this *same settings* for you shell and sailboat layers)
Choose your text tool and choose your text
Color: #d3af84
Add text: Ocean Beauty
(refer to example)
Selections>From Vector Object
Selections>Modify>Expand>2
Create New Raster Layer
Move Raster layer below your text layer
Choose your Flood Fill tool
Color: #d3d7da
Flood fill your raster layer
Selections>Select none
Effects>3D effects>Drop shadow
Use previous settings
Add your name text
Add your copyright
Now you should have something similar to my example
Thank you for taking the time to read/use my tutorial
Labels:CT,PTU tutorial,Tutorials | 0
comments
Blog Award

I received this award from Lavender Angel from Lavender Angel's Cloud
The aim of the award is to bring recognition to blogs with minimal followers.
Since I have accepted the award I must pass it on to at least 3 other blogs(but not more than 5), that have inspired me and I feel deserve a bit more attention.
The rules are to say thank you on my blog to the one who passed it on to me with a link to their blog.
Pick the blogs to pass the award on to,leave a note on their blog and then list them with links to their blogs.
My three blogs are:
October 17, 2011
FTU BCA Kit

Here is a free to use kit I put together. It has 28 elements, alpha, and 6 papers. Not all shown in preview. This kit is for personal use only!
Download from my freebie blog here
Please leave me a little note letting me know you downloaded my kit :)
Labels:Awareness Kits,Freebies | 3
comments
October 15, 2011
PTU After The Rain Tutorial


This tutorial is 100% my creation, any resemblance to any other is coincidence and not intentional.
You must have basic knowledge of PSP.
Scrapkit is called After The Rain by Gina of Kikeka Kits. You can purchase it here
Tube is by Ana Rasha. She is FTU. You can find her work here
Open a new canvas 600x250
Open element cbg_aftertherain_paper12
Copy>Paste>Paste as new layer
Resize as needed
Open your tube layer
Resize as needed
Position to the far right side of your canvas
Choose your text tool
Choose text and text color
Add your quote (see example)
Selections>From Vector object
Selections>Modify>Expand>2
Add a new raster layer and move it below your text layer(vector layer)
Flood fill with a different color from your text color
Select none
Effects>3D Effects>Drop Shadow
Apply these settings:
Offset:
Vertical: 4
Horizontal: 4
Attributes:
Opacity: 50
Blur: 5
Color: Black
Open element cbg_aftertherain_flower06
Copy>Paste>Paste as new layer
Resize: 14
Place under your quote layers
Move to the far left of your canvas
Duplicate
Resize: 40
Place beside your first flower layer (refer to example)
Select your canvas layer
Selections>Select all
Selections>Modify>Select selections border>size 5
Selections>Float
Select your color changer tool>Choose color for your border
Change the color of selected area
Selections>Defloat
Selections>None
Open cbg_aftertherain_ribbon01
Copy>Paste>Paste as new layer
Resize: 5
Place at the end of your quote
Add your name text
Add your copyright
You should now have something similar to my example
Now for the avatar
Open a new canvas 150x200
Open element cbg_aftertherain_paper12
Copy>Paste>Paste as new layer
Resize as needed
Add your tube and resize
Add your text
Add your copyright
You should have something similar to my example
Labels:CT,PTU tutorial,Tutorials | 1 comments
October 9, 2011
FTU Preen Spring Tutorial

This tutorial is 100% my creation, any resemblance to any other tutorial is coincidence and not intentional.
You must have basic knowledge of PSP.
You must have basic knowledge of PSP.
Scrapkit is the FTU work of Daniela of Scrazy Scraps. You download it here
Text I used: Ribbon Happy
Tube: I used the artwork of Ismael Rac. You must have a license to use his work. You can purchase it here and request a license also.
Open a new canvas 600x600
Open paper5
Layers>Load/save mask>Load mask from disk
Choose your mask
I used a misfits mask
Apply your mask>Merge group
Copy>Paste>Paste as new layer in your new canvas
Open your tube layer (i used Ismael Rac)
Copy>Paste>Paste as new layer
Resize as needed
Open Element4
Copy>Paste>Paste as new layer
Resize: 55
Position under your tube layer
Open Element15
Copy>Paste>Paste as new layer
Resize: 45
Move to the upper right corner of your mask/paper layer
Open Element14
Copy>Paste>Paste as new layer
Do not resize
Place behind your element 4 layer
Choose your Element 14 layer
Effects>texture effects>Soft Plastic
Use these settings:
Relief:
Blur: 20
Detail: 14
Density: 32
Lightning:
Angle: 45
Choose your text tool
Choose your text
Apply this color: #ea7087
Apply text: Sweet Like A Butterfly
Selections>From Vector Object
Selections>Modify>Expand>2
Add new raster layer
Move below your vector/text layer
Choose your flood fill tool
Fill with color #bac770
Select none
Add your name text
Add your copyright
You should have something similar to my example
Labels:FTU tutorial,Tutorials | 0
comments
October 5, 2011
Tag: Pretty Girl Swag

Labels:Tags | 0
comments
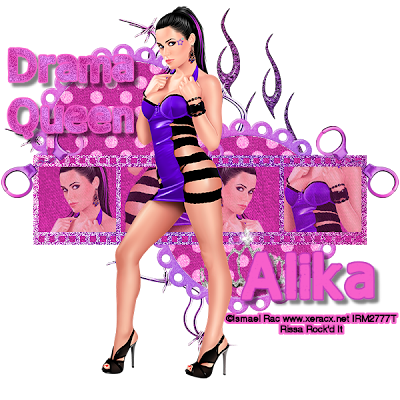
PTU No Drama Allowed Tutorial

This tutorial is 100% my creation, any resemblance to any other is coincidence and not intentional.
You must have basic knowledge of PSP.
I used the art work of Ismael Rac. You must have a license to use it. You can purchase his work here along with a liscense to use it.
I used the Scrapkit No Drama Allowed by Alika Scraps. You can purchase it here
Text: Good Bye Lullaby
Open a new canvas 600x600
Open element as31
Copy>Paste>Paste as new layer
Resize: 55
Move to the upper left corner of your canvas
Duplicate and move your copy layer below your as31 layer but overlap it.
Dupliate that layer and position below your as31 layer in your layers box
Erase the top right overlaping top layer with your eraser tool
Open aspaper03
Copy>Paste>Paste as new layer
Make this your bottom layer
Choose your wand tool
Select your top frame layer then select the inside circle of the frame.
Invert>select paper layer>delete>select none
Repeat steps for your bottom frame
Open your tube of choice
Position as desire(refer to example if needed)
Open element as15
Copy>Paste>Paste as new layer
Make this your new bottom layer
Move to behind your right paper layer
Open element as13
copy>Paste>Paste as new layer
Place under your tube layer
(refer to example)
Open aspaper07
Copy>Paste>Paste as new layer
Place under your as13 layer
Select your selection tool
outline your as13 layer>invert
choose your paper layer>delete>select none
Add another tube layer or different tube of the same artist if they allow it
Position under your as13 layer
Move and place as desired under your far right frame box
Choose your wand tool>select as13 layer>select far right frame box
Invert>choose tube layer>delete>select none
Repeat setps for your other 3 frame boxes
Set Opacity to 69 (ONLY for your four tube layers behind yoru as13 layer
Open element as47
Copy>Paste>Paste as new layer
Place under your right paper layer in the layer box
Move to the edge of your left frame layer(refer to example)
Duplicate and move to above the edge of your left frame layer(refer to example)
Open element as35
copy>Paste>Paste as new layer
Resize: 40
Place above your as13 layer in your layer box
Move to the upper right corner of your as13 layer
Duplicate
Image>Mirror
Open as41
Copy>Paste>Paste as new layer
Place under your top tube layer in your layer box
Move to below your as 13 layer on your canvas and position in the center of that part of your frame layer
Choose your text tool and desired text
Add the text Drama Queen
Add name desired
Add your copyright
Now you should have something similar to my example
Thank you for using/reading my tutorial!
Labels:PTU tutorial,Tutorials | 0
comments
Subscribe to:
Comments
(Atom)
Search
Labels
A Simple Sassy Scrap Creation
(8)
Ad Services
(1)
Alehandra Vanhek
(3)
Alfadesire
(1)
AmyMarie's Kits
(27)
Angel Wing Scraps
(1)
Anna Marine
(2)
Arthur Crowe
(36)
Artistic Reality Talent
(12)
Artistically Inclined Licensing
(7)
Awards
(2)
Awareness Kits
(6)
Bee Hive Studio
(5)
Bella Caribena
(2)
Blog trains
(21)
Bookworm Dezines
(12)
Broken Sky Dezine
(9)
Bundles
(3)
Charity
(1)
Cluster Frame
(65)
Collab
(7)
Collab Templates
(4)
Creation by Sanie
(8)
Creationz by Witchysheart
(2)
Creative Design Outlet
(1)
CT
(547)
CT CALL
(4)
CU
(78)
Dance In The Rain
(2)
Designer Scraps
(9)
Di Hailm
(11)
Ditzy Designs
(6)
Exclusives
(46)
Extras
(8)
Freebies
(194)
Freya Langford Sidebottom
(2)
FTU Kits
(37)
FTU tutorial
(13)
Hania's Design
(2)
Heartfelt Perfections
(1)
Indie Zine
(10)
Inzpired Creationz
(5)
Inzpired Creationz Store
(16)
Irish Bitch Designs
(44)
Irish Princess Designs
(53)
Ismael Rac
(11)
Jose Cano
(7)
Keith Garvey
(1)
KIT
(1)
Kizzed by Kelz
(18)
Kristy's Scraps
(2)
Lady Mishka
(9)
Laguna
(1)
Lollipops n Gumdrops
(44)
Masks
(9)
Matching Kits
(1)
Michelle's Myths
(1)
Myka Jelina
(1)
Mystical Scraps
(13)
Ninaste
(2)
Nocturne
(2)
Overlays
(2)
Paper Pack
(4)
PicsforDesign
(17)
PS Tutorial
(1)
PTU Collab
(1)
PTU CU
(77)
PTU FB Timeline Tutorials
(1)
PTU Kits
(149)
PTU PU
(2)
PTU tutorial
(409)
Quick Pages
(15)
Rabid Designz
(3)
Roman Zaric
(3)
Sale
(8)
Scrap Candy
(130)
Scrappin Krazy Designs
(7)
Scrapping Your Memories
(6)
Scraps and Company
(6)
Scraps from the Heart
(6)
Scriptz R Us
(17)
Selisan Al-Gaib
(1)
Showoffs
(6)
Smiley Creations
(14)
Snaggables
(4)
Snags
(53)
Sneak Peek
(2)
Spazz
(1)
Stargazer Musings
(1)
Sweet PinUp
(5)
Tags
(108)
Templates
(52)
The PSP Project
(51)
The Scrappers Den
(3)
Thrifty Scraps
(6)
Tiny Turtle Designs
(25)
Tiny Turtle Designs Store
(8)
Tony T
(6)
TOU
(1)
Toxic Desirez
(3)
Tunchy Art
(1)
Tutorials
(424)
Verymany
(3)
Wicked Creationz Scraps
(9)
Wicked Princess Scraps
(64)
WordArt
(6)
Blog Archive
- September (1)
- July (1)
- June (2)
- May (6)
- April (9)
- March (6)
- February (19)
- January (8)
- November (12)
- October (15)
- September (14)
- August (15)
- July (23)
- June (12)
- May (14)
- April (8)
- March (15)
- February (8)
- January (22)
- December (17)
- November (20)
- October (23)
- September (30)
- August (25)
- July (27)
- June (28)
- May (30)
- April (25)
- March (39)
- February (50)
- January (44)
- December (31)
- November (39)
- October (45)
- September (55)
- August (32)
- July (12)
- June (27)
- May (31)
- April (20)
- March (19)
- February (10)
- January (25)
- December (17)
- November (20)
- October (9)
- September (22)


