


Showing posts with label FTU tutorial. Show all posts
Showing posts with label FTU tutorial. Show all posts
April 1, 2013
FTU Tutorial~For The Love Of Music

This tutorial is my creation, any resemblance to any other is coincidence and not intentional
Written: 4/1/13
Scrap kit~Music Princess by Sweet Tooth Scraps
Artwork by Verymany
Font~ cain
Items used from kit~
ele33
pp4
pp17
ele6
ele30
ele1
ele5
ele11
ele4
New canvas 600*600
MP_ele33_STS, Paste and Resize 50% and position to your liking
MP_pp4_STS, Paste under frame and delete excess
Add tube(s)
MP_pp17_STS, Resize 75% and apply mask of choice, Merge and Paste
MP_ele7_STS, Paste and Resize 40% and position to your liking
MP_ele6_STS, Paste and Resize 30% and position to your liking
MP_ele2_STS, Paste and Resize 50% and position to your liking
MP_ele30_STS, Paste and Resize 60% and position to your liking
MP_ele1_STS, Paste and Resize 30% and position to your liking
MP_ele5_STS, Paste and Resize 40% and position to your liking
MP_ele11_STS, Paste and Resize 25% and position to your liking
MP_ele4_STS, Paste and Resize 25% and position to your liking
Add drop shadow to elements desired
Add copyright and license
Add name
Save as png

March 12, 2013
FTU Tutorial~Steampunk'd Babe

This tutorial is my creation, any resemblance to any other is coincidence and not intentional
Written: 3/12/13
Scrap kit by Designs by Vaybs called Steampunked
Artwork by Ed van der Linden
Font~ Blueberry
Items used from kit~
frame (5)
paper (2)
paper (4)
element (33)
element (12)
element (8)
element (21)
New canvas 600*600
Frame(5), Paste and Resize 70% and position to your liking
paper(2), paste under frame and delete excess
Add tube(s)
Paper (4), Resize 600*600 and apply mask of choice, merge and paste
Element (33), paste and resize 80% and position to your liking
element (12), paste and resize 27% and position to your liking
Element (8), paste and resize 60% and position to your liking
Element (21), paste and resize 40% and position to your liking
Drop shadow:
Element (8)
Add copyright and license
Add name
Save as png
August 31, 2012
FTU Tutorial~The Ward

This tutorial is 100% my creation, any resemblance to any other is coincidence and not intentional
Written: 8/31/12
You must have basic knowledge of PSP
Scrap kit by Irish Bitch Designs called The Ward
Artwork by Anna Marine
Let's get started!
Open a new canvas 600*600
Open Frame4
Copy & Paste
Resize 50%
Place in the center of your canvas
Open Paper4
Copy & Paste
Resize as needed
Place under your frame layer
Delete excess around frame edges
Open Paper8
Resize 600*600
Apply mask of choice
Merge group
Copy & Paste
Place this above your paper layer
Add your tube
Open HuggyJacket
Copy & Paste
Resize 30%
Add small drop shadow
Open Equiptment
Copy & Paste
Resize 35%
Add small drop shadow
Open Meds
Copy & Paste
Resize 32%
Add small drop shadow
Open Wire
Copy & Paste
Resize 60%
Add small drop shadow
Add your copyright
Add your name text
Save as png
August 15, 2012
FTU Steampunked Tutorial

This tutorial is 100% my creation and any resemblance to any other is coincidence and not intentional.
Written: 8/15/12
Scrap kit by Designs by Vaybs called Steampunked
Artwork by Jason Lan
Let's get started!
Open a new canvas 600*600
Open DBV_Steampunked_frame(5)
Copy & Paste
Resize 80%
Open DBV_Steampunk_paper(2)
Copy & Paste
Resize as needed
Place under your frame layer
Delete excess around frame edges
Add your tube
Add small drop shadow
Open DBV_Steampunk_paper(6)
Resize 600*600
Add you mask
Merge group
Copy & Paste
Make this your bottom layer
Open DBV_Steampunked_element(4)
Copy & Paste
Do not resize
Add small drop shadow
Open DBV_Steampunked_elements (27)
Copy & Paste
Do not resize
Add your name text
Add copyright
Save as png
May 30, 2012
FTU Tutorial~ Groovy

This tutorial is 100% my creation, any resemblance to any other is coincidence and not intentional.
Written: 5/30/12
Scrap kit by Irish Bitch Designs called Flower Power
I used the awesome artwork of Myka Jelina. You can purchase her tubes here
You can download my cluster frame for this tutorial here
Let's get started!
Open a new canvas 600x600
Open your cluster frame
copy & paste
Resize as needed
Erase the copyright
Open Paper6
copy & paste
Resize as needed
Place under your frame layer
Delete excess around edges
Add your full size tube
Resize if needed
Move to your desire
Add small drop shadow
Add your close up tube
Place under your frame
Delete excess
Set Opacity to around 65
Open Paper4
Resize to 600x600
Apply your mask
Merge group
copy & paste
Place to your desire
Make this your bottom layer
Open bus2
copy & paste
Resize as needed
Place to your desire
Add small drop shadow
Open Groovy
copy & paste
Resize 25%
Place above your radio handle
Add small drop shadow
Add your copyright
Add your name text
Save as
You should have something similar to my example
~Thank you for using my tutorial~
May 18, 2012
FTU Tutorial~Cherries & Cream

This tutorial is 100% my creation, any resemblance to any other is coincidence and not intentional.
Written: 5/18/12
Scrap Kit by Kate of Irish Bitch Designs called Cherries & Cream
I used the artwork of Andrea Young, a tube called Cherry Pie. You must have a license to use her work. You can get that and her artwork here
Let's get started!
Open a new canvas 600x600
Open Frame2
Copy & Paste
Resize to your desire
Place in the center or your canvas
Open Paper4
Copy & Paste
Resize as needed
Place under your frame
Delete excess around edges
Add your close up tube
Delete excess
Add your full size tube
Add small drop shadow
Open Cherries2
Copy & Paste
Resize 30%
Move to the top right corner of your frame
Add small drop shadow
Open Cup
Copy & Paste
Resize 20%
Place near the bottom right corner of your frame
Add small drop shadow
Open Cupcake
Copy & Paste
Resize 20%
Place near your cup
Add small drop shadow
Open Paper10
Resize to 600x600
Apply mask
Merge group
Copy & Paste
Make this your bottom layer
Resize as needed
Add your name text
Add your copyright
You should have something similar to my example
~Thank you for using my tutorial~
February 28, 2012
FTU Tutorial~ Rockin' Irish


This tutorial is 100% my creation, any resemblance to any other is coincidence and not intentional.
Written: 2/28.12
You must have basic knowledge of PSP
I used the artwork of Arthur Crowe. You must have a license to use his work. You can get that and purchase his artwork here
Scrap Kit by Kate of Irish Princess Designs called Rockin Irish
Let's get started!
Open a canvas 600x250
Open Paper2
Open your Materials Properties window
Select your pattern tab
Choose your Paper2 pattern
Choose yoru flood fill tool
Flood fill your canvas with your pattern
Selections>Select All
Selections>Modify>Select Selection Borders
Size: 7
Selections>Float
Open your Materials Properties again
Select your gradient tab>Edit
Choose your two gradient colors>Apply
Flood fill your border with your gradient
Adjust tab>Add/remove noise>Add noise
Play with the settings until you get what you desire>Apply
Selections>Defloat
Selections>Select none
Add your tube as you like
Apply opacity to your tubes as you like if desired
Open Lips
Copy>Paste>Paste as new layer
Resize as needed
Place in the bottom left corner
Duplicate
Image>Mirror
Open Flames
Copy>Paste>Paste as new layer
Place under your tube layer
Resize as needed
Apply opacity as desired
Add your name text
Add your copyright
Now for the avatar!
Open new canvas 175x250
Flood fill with your Paper2 Pattern
Selections>Select all
Selections>Modify>Select Selection Borders
Size: 7
Select>Float
Flood fill your border with your gradient
Add your noise to your border
Select>Defloat
Select>Select none
Add your tube
Add your lips element if desired
Add your name or Initial
Add your copyright
You should have something similar to my example
~Thank you for using my tutorial~
And here is a show off tag I make with her kit too!!

January 20, 2012
FTU Tutorial~ Denim & Lace

This tutorial is 100% my creation, any resemblance to any other is coincidence and not intentional.
Written: 1/20/12
You must have basic knowledge of PSP
Scrap Kit by Irish Princess Designs called Denim & Lace
I used the artwork of Unholy Vault Designs. You must have a license to use UVD's work. You can get a license and UVD'S work here
Supplies needed:
Font: LMS School Girl Crush
Scrap Kit: Denim & Lace
Mask of choice
Tube of choice
Let's get started!
Open a new canvas 600x600
Open Pocket Frame2
Copy>Paste>Paste as new layer
Resize: 55
Place in the center of your canvas
Open LaceRing
Copy>Paste>Paste as new layer
Do not resize
Place under your Pocket Frame layer
Reposition as necessary
Open Paper5
Copy>Paste>Paste as new layer
Resize to a smaller size
Place under your LaceRing layer
Delete excess paper
Open you tube of choice
Copy>Paste>Paste as new layer
Place as desired or refer to example
Open Balloons
Copy>Paste>Paste as new layer
Size down to your desire
Place in the upper right corner of your Pocket frame layer
Duplicate
Move your duplicate layer to the left of corner of your frame layer and under your tube layer
Open Toast2
Copy>Paste>Paste as new layer
Resize as desired
Place in the bottom right corner of your frame layer
Duplicate
Image>Mirror
Move your duplicate layer back over to your original layer and place as desired
Add a drop shadow to both layers
Open BlueLove
Copy>Paste>Paste as new layer
Resize as needed
Place near your Toast2 layers
Open Paper11
Layers>Load/Save Mask>Load Mask from Disk
Choose your mask
Apply
Merge>Merge group
Copy>Paste>Paste as new layer
Resize as needed
Make this your bottom layer
Add your copyright
Add your name text
Now you should have something similar to my example
~Thank you for using/reading my tutorial~
December 12, 2011
FTU Joyous Tutorial

This tutorial is 100% my creation, any resemblance to any other is coincidence and not intentional.
Scrap Kit by Shani of Wicked Princess Scraps. You can down load it here
I used the artwork of Ismael Rac. You can purchase it here and you must have a license to use his work.
Open a new canvas 650x650
Open WP_JOY_FRAME
Copy>Paste>Paste as new layer
Resize: 80
Position in the center of your canvas
Open WP_JOY_pp11
Copy>Paste>Paste as new layer
resize as needed
Choose your wand tool
Select the inner area of your frame layer
Selections>Invert
Choose your paper layer>Delete
Selections>Select None
Open your tube of choice
Copy>Paste>Paste as new layer
Delete excess tube
Open WP_JOY_TREEORNAMENT
Copy>Paste>Paste as new layer
Resize: 50
Position near the bottom right corner of your frame layer
Open WP_JOY_HEARTORNAMENT
Copy>Paste>Paste as new layer
Resize: 40
Move to the top left side of your frame layer
Open WP_JOY_pp10
Layers>Load/Save Mask>Load Mask from disk
Choose your mask>Apply
Merge>Merge group
Copy>Paste>Paste as new layer
Make this your bottom layer
Resize as needed
Add your name text
Add your copyright(if needed)
You should have something similar to my example
~Thank you for reading/using my tutorial~
November 29, 2011
FTU Tutorial~ Candy Christmas


This tutorial is 100% my creation, any resemblance to any other is coincidence and not intentional.
You MUST have basic knowledge of PSP.
Scrap Kit~Candy Christmas by Irish Princess Designs
I used the artwork of FallnAngel called Norm, Santa's Helper. You must have a license to use her work. You can purchase her tubes here
Open new canvas 600x250
Open Paper1
Copy>Paste>Paste as new layer
Resize as needed and delete the excess paper
choose your canvas layer>Selections>Select All
Choose your Paper Layer>Selections>Modify>Select Selection borders> Size 7
Selections>Float
Open Paper6
Choose your Flood fill tool
Open your Materials window>Select the Pattern tab
Choose your Paper6 Pattern>Flood fill your border with this
Adjust>Add/Remove Noise> Add Noise
Use these settings:

Uniform
Noise: 50
Monochrome
Selections>Defloat
Selections>Select None
Open your tube layer
Copy>Paste>Paste as new layer
Resize as needed and delete excess passed the inner border edge
Refer to example
Open Cookies
Copy>Paste>Paste as new layer
Resize as needed and place as desired
Add drop shadow
Open Lolly5
Copy>Paste>Paste as new layer
Resize, Rotate and place as desired
Open Lolly6
Copy>Paste>Paste as new layer
Resize, Rotate, and place as desired
Add your name text
Add your copyright (if required)
Now for the avatar:
Open a new canvas 150x250
Choose your Flood fill tool
Open your materials window
Choose your pattern tab>Select the Paper1 for your pattern
Flood fill your canvas with that
Selections>Select all
Selections>Modify>Select Selection borders>Size 6
Select>Float
Choose your flood fill tool>Materials tab>Pattern>Paper6
Flood fill border
Add noise (same settings as before)
Selections>Defloat
Selections>Select None
Open your tube
Copy>Paste>Paste as new layer
Resize as needed
Place as desired>Delete excess
Add copyright
Add name initial
Now you should have something similar to my example
~Thank you for reading/using my tutorial~
October 9, 2011
FTU Preen Spring Tutorial

This tutorial is 100% my creation, any resemblance to any other tutorial is coincidence and not intentional.
You must have basic knowledge of PSP.
You must have basic knowledge of PSP.
Scrapkit is the FTU work of Daniela of Scrazy Scraps. You download it here
Text I used: Ribbon Happy
Tube: I used the artwork of Ismael Rac. You must have a license to use his work. You can purchase it here and request a license also.
Open a new canvas 600x600
Open paper5
Layers>Load/save mask>Load mask from disk
Choose your mask
I used a misfits mask
Apply your mask>Merge group
Copy>Paste>Paste as new layer in your new canvas
Open your tube layer (i used Ismael Rac)
Copy>Paste>Paste as new layer
Resize as needed
Open Element4
Copy>Paste>Paste as new layer
Resize: 55
Position under your tube layer
Open Element15
Copy>Paste>Paste as new layer
Resize: 45
Move to the upper right corner of your mask/paper layer
Open Element14
Copy>Paste>Paste as new layer
Do not resize
Place behind your element 4 layer
Choose your Element 14 layer
Effects>texture effects>Soft Plastic
Use these settings:
Relief:
Blur: 20
Detail: 14
Density: 32
Lightning:
Angle: 45
Choose your text tool
Choose your text
Apply this color: #ea7087
Apply text: Sweet Like A Butterfly
Selections>From Vector Object
Selections>Modify>Expand>2
Add new raster layer
Move below your vector/text layer
Choose your flood fill tool
Fill with color #bac770
Select none
Add your name text
Add your copyright
You should have something similar to my example
September 14, 2011
Tutorial: The Devil's Desire
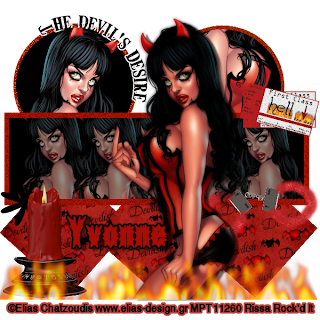
This tutorial is of my own creation any resemblance to any other tutorial is purely coincidence and was not intentional. This tutorial is for personal use only!!!
Text: Aftermath BRK (name only)
You can download my template here
Scrapkit is the work of Scraps by Randy's Sin, you can download the kit here
You will need knowledge of PSP to complete this tutorial.
Open your template and delete Raster 4 and Vector 3.
Now let's get started!
First thing we're going to do is select Layer 8.
Select your Color changer tool.
Then set your color to #c71903.
Fill Layer 8 with that color.
Repeat for Layers 1, 2, 4 and 6 with the same color.
Select Layer 3.
Set your color to #ab0c05
Fill layer 3 with that color.
Select layer 9.
Set your color to #000000.
Flood fill layer 9 with this color.
Repeat with layers 5 and 7.
Open your tube of choice.
Copy>paste>paste as new layer
Position full tube on tag as you wish.
Duplicate tube.
Adjust>Blur>Gauassian blur
Set Layer property to multiply.
Effects>3D effects>drop shadow
Use these settings:

Offset:
Vertical: 3
Horizontal: 8
Attributes:
Opacity: 50
Blur: 3
Color: black
Horizontal: 8
Attributes:
Opacity: 50
Blur: 3
Color: black
Paste another layer of your tube.
Position above Layer 9.
Resize tube to your liking and position to the right above layer 9.
Choose your wand tool and highlight layer 9.
Invert selection>select tube layer>delete
select none.
Set Opacity to around 55.
Copy that tube layer>paste>paste as new layer beside previous tube layer.
Position beside that tube layer.
Do this 3 or 4 more times to fill layer 9 with those tube layers.
Now copy a new tube layer>paste>paste as new layer
Position tube layer over layer 5.
Select layer 5.
Choose your wand tool and highlight layer 5.
Invert Selection.
Select tube layer>delete.
Select none.
Paste another new tube layer.
Position above Layer 7.
Select Layer 7.
Choose your wand tool and highlight layer 7>invert selection
select tube layer>delete.
select none.
Open Paper 11
Select Layer 1>choose wand tool and highlight
Copy Paper 11>Paste>Paste into selection
Select none.
Repeat for Layers 2 and 3
Elements I used:
Candle 3
Flames 1
Ticket to Hell 1 (for this one delete Layer 10, you may also choose to do this to Vector 1)
Cuffs 1
Resize these and place them as you desire.
Add your text.
Add your copyright.
You should have something similar to my example at the top.
Thank you for using/reading my tutorial. Please leave a comment and let me know what you think.
Tutorial: And With One Finger
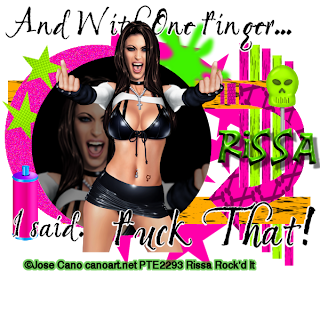
This tutorial is of my own creation any resemblance to any other tutorial is purely coincidence and was not intentional. This tutorial is for personal use only!!
I am using the work of Jose Cano. You can find his workhere. You MUST have a license to use his art.
Text: Montgomery
You can download my template here
Scrapkit I used the work of Black Widow Creations, you can download the kit here
Open your template.
Delete layer Vector 7
Now that you have done that let's get started, shall we??
Ok, let's go!!!
Click on "Layer 1" and use your wand tool and select Layer 1 then invert selection. (shift+alt+I)
Open Paper 7, copy, paste>paste into selection
Select none. (ctrl+D)
Now choose "Layer 2" and use your wand tool and select Layer 2 then invert selection.
Paste Paper 7 into selection.
Select none.
Now if you choose delete Layers 1 & 2.
You should have something that looks like this.

Open Paper 8.
Choose "Vector 2", use your wand tool and select strip 1.
(closet to the large circles)
Copy Paper 8, paste>paste into selection.
Select none.
Repeat for strips 3 & 5.
Open Paper 6.
Choose strip 2 with your wand tool.
Copy Paper 6 and paste>paste into selection.
Select none.
Repeat for strip 4.
Select layer "Raster 6".
Flood fill tool.
Bring up your Material properties.
Color # to enter #40f200, click ok.
Flood fill layer "Raster 6"
Adjust>Blur>Gauassion Blur.
Radius 3.
Open Paper 5.
Select layer "Raster 2"
Only half the arrow will highlight!
Copy Paper 5, paste>paste into selection.
Select none.
Repeat for the 2 small strips of the arrow.
You should now have something that resembles this:

Flood fill word art as desired!
Open tube of choice.
Copy desired layer>paste>paste as new layer.
Resize to your liking.
Duplicate tube layer.
Move copy to be positioned above layer "Vector 3"
Duplicate once more.
Resize to your liking and move to above "Vector 1" and below "Raster 8"
Choose your wand tool and select layer "Vector 1"
Invert Selection.
Delete.
Select none.
Adjust Opacity down to around 55.
Open Element 23.
Copy>paste>paste as new layer.
Resize as you see fit then move to left side.
Open Element 4.
Copy>paste>paste as new layer.
Other Elements I used and place them to your satisfaction:
Element 33
Element 50
Select your text tool.
Choose your text.
Choose your color. (I used #55dd01)
Apply desired name and size.
Effects>3D Effects>Inner Bevel
Use these settings:
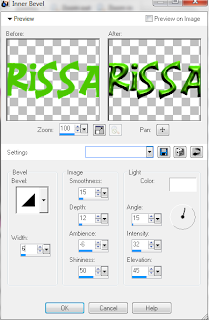
Smoothness: 15
Depth: 12
Ambience: -6
Shininess: 50
Angle 15
Intensity: 32
Elevation: 45
Width: 6
Depth: 12
Ambience: -6
Shininess: 50
Angle 15
Intensity: 32
Elevation: 45
Width: 6
Select Raster 13
Effects>3D Effects>Drop Shadow
Use these settings:

Offset Vertical: 8
Horizontal: 8
Attributes: Opacity: 50
Blur: 2
color: black
Horizontal: 8
Attributes: Opacity: 50
Blur: 2
color: black
Add your copyright.
You should have something like my example at the top.
Thank you for taking time to use/read my tutorial.
Subscribe to:
Posts
(Atom)
I CT For


CU4CU License


