


May 31, 2012
Bundle Deal

Now available in select stores
Includes:
Sexy Summer
Sexy Zebra
Sexy Zebra
Vegas ShowGirl
New Kit~Ann

New kit now available in select stores
Includes:
30 Elements
8 Papers
May 30, 2012
FTU Tutorial~ Groovy

This tutorial is 100% my creation, any resemblance to any other is coincidence and not intentional.
Written: 5/30/12
Scrap kit by Irish Bitch Designs called Flower Power
I used the awesome artwork of Myka Jelina. You can purchase her tubes here
You can download my cluster frame for this tutorial here
Let's get started!
Open a new canvas 600x600
Open your cluster frame
copy & paste
Resize as needed
Erase the copyright
Open Paper6
copy & paste
Resize as needed
Place under your frame layer
Delete excess around edges
Add your full size tube
Resize if needed
Move to your desire
Add small drop shadow
Add your close up tube
Place under your frame
Delete excess
Set Opacity to around 65
Open Paper4
Resize to 600x600
Apply your mask
Merge group
copy & paste
Place to your desire
Make this your bottom layer
Open bus2
copy & paste
Resize as needed
Place to your desire
Add small drop shadow
Open Groovy
copy & paste
Resize 25%
Place above your radio handle
Add small drop shadow
Add your copyright
Add your name text
Save as
You should have something similar to my example
~Thank you for using my tutorial~
Flower Power Cluster Frames

New freebie cluster frames using Irish Bitch Designs kit Flower Power.
You can download the cluster frames from my freebie blog here
May 28, 2012
New Kit~Loria

New kit now available in most stores
Includes:
54 Elements
10 Papers
May 25, 2012
PTU Fairy Lights Tutorial

This tutorial is 100% my creation, any resemblance to any other is coincidence and not intentional.
Written: 5/25/12
I used a mask from this pack here
Scrap kit by DnScraps called Fantasy Paradise. You may purchase that here
I used the FTU artwork of Ana Rasha. You can find her work here
Let's get started!
Open a new canvas 600x600
Open doubleframe
Copy & Paste
Resize 58%
Place in the center of your canvas
Open Paper9
Copy & Paste
Resize as needed
Place under your frame
Delete excess around frame edges
Add your tube
Duplicate 3 times
Move under your frame
Delete excess as you desire
set Opacity to all 3 duplicates to around 75
Add drop shadow to main tube
Open Paper8
Resize to 600x600
Apply your mask
Merge group
Copy & Paste
Make this your bottom layer
Resize as needed
Open butterfly4
Copy & Paste
Resize 58%
Move to the top right of your frame
Place above your mask layer
Open lightss
Copy & Paste
Resize as needed
Place under your paper layer on the right side of your frame
Add small drop shadow
Add your copyright
Add your name text
You should have something similar to my example
~Thank you for using my tutorial~
May 24, 2012
New Kit~Kate

New kit now available
Includes:
42 Elements
14 Papers
May 20, 2012
A Freebie for you
Here is a mini kit and another kit I made for a forum that no longer exists so I thought I would offer them as freebies on my blog for you all to enjoy!!

Download from my freebie blog here
New Kit~Vickie

New kit now available in all stores aside from Heartfelt Perfections
Includes:
42 Elements
10 Papers
Colour Your World-The Brown Tag

May 19, 2012
PTU Torn Tutorial


This tutorial is 100% my creation, any resemblance to any other is coincidence and not intentional.
Written: 5/19/12
Scrap Kit by Scrappin Krazy Designs called Rawkin Goth. You can find her kits here
I used the artwork of Verymany. You must have a license to use their artwork. You may get that and their tubes here
Find the textures here
Plugin: Xero>Frillarity
Let's get started!
Open a new canvas 600x200
Open P10
Material Properties>Pattern
Make P10 your pattern
Select your flood fill tool
Flood fill your canvas with your P10 pattern
Add a new raster layer
Selections>Select all
Selections>Modify>Select Selection Borders
Use these settings:

Flood fill with your gradient
Colors:
Color 1: #7c4d93
Color 2: #1a082e
Color 3: #533362
Use these settings:

Selections>Float
Effects>Plugins>Xero>Frillarity
Use these settings:

Selections>Defloat
Selections>Select None
Add your tube
Delete excess
Add small drop shadow
Open your texture
Place over your pattern layer
Set your blending mode/layer properties to Overlay
Open wireheart
Copy & Paste
Enlarge slightly
Place in the center of your canvas
Set Opacity to around 67
Add your "Torn" wordart
I used German Beauty Font
My gradient as the color
Expand by 3
Flood fill with black
Add small drop shadow
Select your vector layer of your wordart
Adjust>Add/remove noise>Add noise
Use these settings:

Make you a rectangle the length of your canvas
Color: #404040
Convert to raster layer
Set Opacity to 75
Add your name text
I used Gesture Thin BRK Font
Do not add a drop shadow
Set Opacity on both layers to around 70
Add your copyright
Now for your avatar
Open new canvas 200x200
repeat steps for your pattern, border, and texture
Do not add your wiredheart element
Add your tube
Add your name text
Add your copyright
You should have something similar to my example
~Thank you for using my tutorial~
May 18, 2012
Cherries & Cream Forum Set


FTU Tutorial~Cherries & Cream

This tutorial is 100% my creation, any resemblance to any other is coincidence and not intentional.
Written: 5/18/12
Scrap Kit by Kate of Irish Bitch Designs called Cherries & Cream
I used the artwork of Andrea Young, a tube called Cherry Pie. You must have a license to use her work. You can get that and her artwork here
Let's get started!
Open a new canvas 600x600
Open Frame2
Copy & Paste
Resize to your desire
Place in the center or your canvas
Open Paper4
Copy & Paste
Resize as needed
Place under your frame
Delete excess around edges
Add your close up tube
Delete excess
Add your full size tube
Add small drop shadow
Open Cherries2
Copy & Paste
Resize 30%
Move to the top right corner of your frame
Add small drop shadow
Open Cup
Copy & Paste
Resize 20%
Place near the bottom right corner of your frame
Add small drop shadow
Open Cupcake
Copy & Paste
Resize 20%
Place near your cup
Add small drop shadow
Open Paper10
Resize to 600x600
Apply mask
Merge group
Copy & Paste
Make this your bottom layer
Resize as needed
Add your name text
Add your copyright
You should have something similar to my example
~Thank you for using my tutorial~
New Kit~Country Kitchen

New kit now available in all stores
Includes:
53 Elements
8 Papers
PU Only
May 17, 2012
PTU Broken Tutorial

This tutorial is 100% my creation, any resemblance to any other is coincidence and not intentional.
Written: 5/17/12
Scrap Kit by Whispy's D'zines called Broken. You may purchase it here
I use the artwork of Verymany. You must have a license to use their work. You can get that and purchase their work here
Let's get started!
Open a new canvas 600x600
Open ele46
Copy & Paste
Resize 92%
Place in the center of your canvas
Open PP7
Copy & Paste
Place under your frame
Resize as needed
Delete excess around frame edges
Add your close up tube
Place under your frame
Delete excess
Set Opacity to around 60
Add your full size tube
Place to the right of your frame
(above it)
Add small drop shadow
Open el15
Copy & Paste
Do not resize
Rotate to your desire
Place under your paper layer
Move to the left
Open el36
Copy & Paste
Place near the bottom of your frame
Add small drop shadow
Open el2
Copy & Paste
Resize 30%
Place near your el36
Add small drop shadow
Open el8
Copy & Paste
Resize 30%
Move to the left side of your frame
(Refer to example)
Add small drop shadow
Open el19
Copy & Paste
Resize 27%
Move to close to your two hearts
Add small drop shadow
Open PP8
Resize to 600x600
Add your mask
Merge group
Copy & Paste
Resize if needed
Make this your bottom layer
Add your copyright
Add your name text
You should have something similar to my example
~Thank you for using my tutorial~
May 14, 2012
New Kit~Sexy Summer

New Kit now available in all stores
Includes:
95 Elements
12 Papers
PTU Once Upon A Forest Tutorial


This tutorial is 100% my creation, any resemblance to any other is coincidence and not intentional.
Written: 5/13/12
Plugins:
Eye Candy 4000>HSB Noise
Scrap Kit by Kate of Irish Bitch Designs called Once Upon A Forest. You can find her kits here
I used the artwork of Misticheskaya. You must have a license to use their artwork. You can get that and purchase their work here
Let's get started!
Open a new canvas 600x250
Open Paper12
Make this your pattern
Flood fill your canvas with your pattern
Add new raster layer
Selections>Select All
Selections>Modify>Select Selections Border
Use these settings:

Flood fill with #d4b7d6
Selections>Float
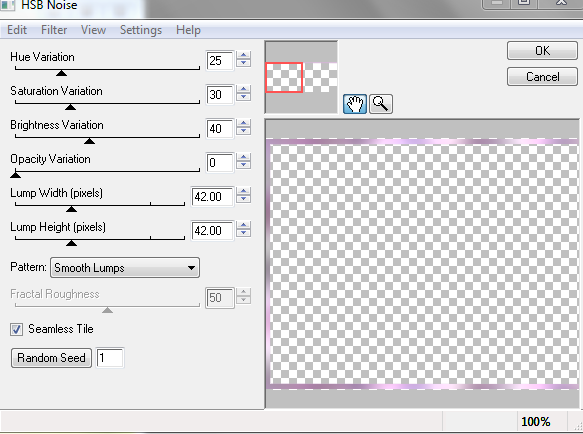
Effects>Plugins>Eye Candy 4000>HSB Noise
Use these settings:
Selections>Defloat
Selections>Selete None
Add your tube
Add small drop shadow
Open BerryBush
Copy & Paste
Resize 45%
Move to the far left of your canvas
Open Bird2
Copy&Paste
Resize 10%
Place over your BerryBush
Add small drop shadow
Open Fox
Copy&Paste
Resize 10%
Place near the bottom left of your canvas
Add small drop shadow
Open ForestHouse
Copy & Paste
Resize 22%
Place near the bottom of your canvas near your fox layer
Add small drop shadow
Open FairyDust
Copy & Paste
Place above your paper layer
Do not resize
Add your copyright
Add your name text
Save
You should have something similar to my example
Now for the avatar
Open a new canvas 150x200
Flood fill with your Paper12 pattern
Repeat steps for your border
Add your tube
Add small drop shadow
Add any elements desired
Add your copyright
Add your initial text
Save
You should have something similar to my example
~Thank you for using my tutorial~
May 10, 2012
PTU Every Heartbeat Tutorial


This tutorial is 100% my creation, any resemblance to any other is coincidence and not intentional.
Written: 5/10/12
I used the artwork of Arthur Crowe. You must have a license to use his work, you can get that and purchase his stuff here
Scrap Kit by Jen's Sweet Temptations called Every Heartbeat. You may purchase that here
Let's get started!
Open a new canvas 600x250
Open your materials window
Make a new gradient with these colors or colors of choice
Color 1: #1c9492
Color 2: #e5e5e5
Color 3: #5b2e20
Use these settings:

Flood fill your canvas with your gradient
Selections>Select all
Effects>Texture effects>Mosaic Antique
Use these settings:

Selections>Select None
Add close up of your tube
Resize and postion to the right as needed
Duplicate
Image>Mirror
Merge down
Set your blending mode or layer properties to Overlay
Add new raster layer
Place above your tubes layer
Selections>Select All
Modify>Select Selections Border
Use these settings:

Flood fill your border with #381c16
Adjust>Add/remove noise>Add noise
Use these settings:
Selections>Select None
Add your tube again
Place in the center
Move to under your border layer
Position as needed
Delete excess
Duplicate
Adjust>Blur>Gaussian Blur
Use these settings:

Set your layer properties to Overlay
Open Cupcake2
Copy & Paste
Resize 27%
Place near your right bottom corner
Add small drop Shadow
Open Flower2
Copy & Paste
Resize 32%
Move to the bottom right corner
Add your copyright
Add your name text
You should have something similar to my example
Now for the avatar
Open a new canvas 150x150
Fill with previous gradient
Selections>Select all
Effects>Texture Effects>Mosaic Antique
Use these settings:

Selections>Select None
Open your close up tube
Paste
Resize as needed
Layer Properties: Overlay
New raster layer
Selections>Select all
Selections>Modify>Select Selections Border
Use these settings:

Flood fill with #381c16
Adjust>Add/remove noise>Add noise
Use these settings:

Select>Select None
Add your copyright
Add your initial text
You should have something similar to my example
~Thank you for using my tutorial~
New Kit~Coffee & Tea

New kit now available at all my stores
May 8, 2012
PTU Totally 80's Tutorial

This tutorial is 100% my creation, any resemblance to any other is coincidence and not intentional.
Written: 5/8/12
I used the artwork of Myka Jelina. You must have a license to use her tubes. You can get that and her artwork here
Scrap Kit by Kaci of Scrappin Krazy Designs called Totally 80's which you can find here
Let's get started!
Open a new canvas 600x600
Open frame2
Copy & Paste
Resize 75%
Place in the center or your canvas
Open p10
Copy & Paste
Resize as needed
Place under your frame layer
Delete excess aroudn frame edges
Add your close up tube
Place under your frame
Delete excess around edges
Set Opacity to around 67
Add your full size tube
Place near the left of your frame
Add small drop shadow
Open p14
Resize to 600x600
Add your mask
Merge group
Copy & Paste
Make this your bottom layer
Resize if needed
Position to your desire
Open Flower
Copy & Paste
Resize 65 %
Place near the bottom right of your frame
Add small drop shadow
Open Glasses
copy & paste
Resize 50%
Rotate to your desire
Place behind the top of your flower
Add small drop shadow
Open doodle3
Copy & Paste
Image>Mirror
Place under your paper layer
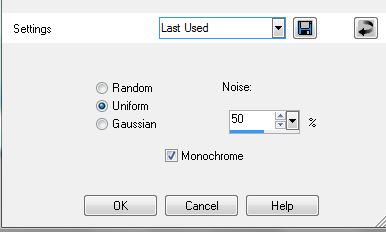
Adjust>Add/remove noise>Add noise
Settings:

Uniform
Noise: 50%
Monochrome
Add small drop shadow
Add your name text
Add your copyright
You should have something similar to my example
~Thank you for using my tutorial~
PTU Citrus Bistro Tutorial

This tutorial is 100% my creation, any resemblance to any other is coincidence and not intentional.
Written: 5/8/12
Scrap Kit by Kate of Irish Bitch Designs. You can find her kits here
Artwork by Lorenzo Di Mauro. You must have a license to use his work. You can get that and his artwork here
Let's get started!
Open a new canvas 600x600
Open Frame3
Copy & Paste
Resize 60%
Place in the center or your canvas
Open Paper7
Copy & Paste
Place under your frame layer
Resize as needed
Delete excess around frame edges
Add close up of tube under your frame
Delete excess around frame edges if necessary
Set Opacity to around 65
Add full tube
Add small drop shadow
Open Bow
Copy & Paste
Resize 35%
Image>Free Rotate
Use these settings:

Move to the top right of your frame layer
Add small drop shadow
Open Bouquet
copy & Paste
Resize 25%
Place near the bottom right of your frame
Add small drop shadow
Open Bouquet In Vase
Copy & Paste
Resize 25%
Place above your bouquet
Add small drop shadow
Open Coffee
Copy & Paste
Resize 30%
Place near the bottom left of your frame
Add drop shadow
Open Paper9
Add mask
Merge group
Copy & Paste
Make this your bottom layer
Resise if needed
Add your name text
Add your copyright
You should have something similar to my example
~Thank you for using my tutorial~
May 7, 2012
Punk Lick This WordArt
Here is the wordart I made for the Punk Lick Tutorial
It is PNG format so you can just right click and save

PTU Punk Lick Tutorial

This tutorial is 100% my creation, any resemblance to any other is coincidence and not intentional.
Written: 5/7/12
Artwork by Ismael Rac. You can find his artwork here, You must have a license to use his work which you can get at the same link.
Scrap kit by Pink Candy Designs called Punk Lick. You can purchase it here
Let's get started
Open a new canvas 600x600
Open Frame3
Copy & Paste
Resize: 78 %
Open pp9
Copy & Paste
Resize as needed
Place under you frame layer
Delete excess around edges
Add your tubes
Add a drop shadow to your main tube
Open pp4
Resize to 600x600
Add your mask to it
Merge group
Copy & Paste
Make this your bottom layer
Open Bottle
Copy & Paste
Resize: 40%
Place to your desire
Open bow3
Copy & Paste
Resize: 55%
Place to your desire
Add small drop shadow
Open beads2
Copy & Paste
Place above your mask layer
Dupliate
Image>Mirror
Resize both and arrange as needed
Open Cupcake
Copy & Paste
Resize: 40%
Place near your bottle
Add drop shadow
Open Wire
Copy & Paste
Resize: 92%
Place above your mask layer
Add drop shadow
Add wordart of choice
Add name text
Add copyright and watermark
You should have something similar to my example
~Thank you for using my tutorial~
Subscribe to:
Posts
(Atom)
I CT For


CU4CU License


")

